Navigation: Projects → Activities
Activity is a distinct, scheduled portion of work necessary for timely completion of the Project. WiseTeam provides a possibility to define Project Activities, their start and finish dates, their interrelationships, break Activities down into manageable Tasks assigned to individuals.
Review Activity form
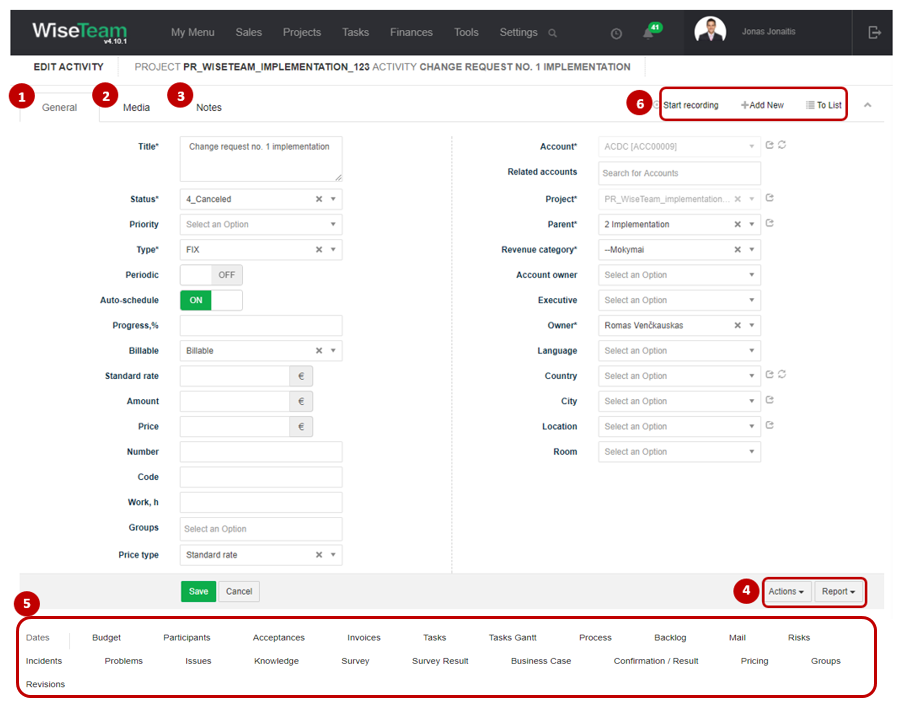
1. General information about Activity is provided in tab General. You have to fill in this information when creating new Activity.
2. In tab Media it is possible to attach files. Click Select Files or do Drag & Drop.
3. In tab Notes it is possible to leave notes. Click Add note to create new note.
4. Actions that can be taken with Activity:
- Copy: allows copying Activity in order to simplify the process of creating new Activities. Possible copy the budget of activity.
- Import Activities: allows importing children activities from another Project.
- Set Project: allows assigning Activity to another Project. This option is available if Activity has assigned resources in budget, related Tasks or Time records, but it will not be possible to assign Activity to another Project, if baseline is submitted, related Acceptance certificate, Invoice, Incident, Risk, etc. created.
- Cancel Record: allows canceling activity record and all related tasks that are planned or in progress.
- Generate A3 report: there is a possibility to generate A3 Report and Budget report.
- Generate budget report: there is a possibility to export Budget tab’s information to MS Excel.
5. Available Info Tabs:
- Dates: indicate all the dates – baseline start, baseline finish, start, finish, actual start, actual finish, duration – of the Activity.
- Budget: allows planning and monitoring budget of a particular Activity.
- Participants: allows adding ant importing participants of the Activity. This functionality is designed for training companies.
- Acceptances: if Activity is Billable it shows Acceptance certificates that are related to that Activity. Click
 and select Assign to relate Activity to existing Acceptance certificate or click
  to add new Acceptance certificate.
 - Invoices: allows seeing related Invoices.
- Tasks: allows creating and managing tasks of various types related to the Activity. Click to add new Task or and select Process to generate Tasks from a template.
- Tasks Gantt: visualizes Tasks in a Gantt chart.
- Process: allows seeing the progress of initiated processes. If multiple processes are running, you can cancel active processes with Cancel all at the same time,
 .
. - Triggers: allows seeing and creating task process triggers related to particular Activity. Click
 to add new Process Trigger record.
 - Backlog: allows seeing and creating backlog records related to Project. Click to add new Backlog record. Click
 to add new Task. Click
  and :
and :
- select Set All Completed to change the status of all related Backlog records to Completed.
- select Assign Group to assign the group to all related Backlog records.
- select Remove Group to remove the group from all related Backlog records.
- Mail: allows seeing, creating and assigning related emails. Click to create new email. Click to assign email.
- Risks: indicates information related to Risks of particular Activity. Click to add new Risk and fill information.
- Incidents: indicates information related to Incidents of particular Activity. Click to add new Incident and fill information.
- Problems: indicates information related to Problems of particular Activity. Click to add new Problem and fill information.
- Issues: indicates information related to Issues of particular Activity. Click to add new Issue and fill information.
- Knowledge: allows seeing and adding related Knowledge base’s records.
- Survey: allows adding survey for a Project.
- Survey Results: allows adding survey and reviewing survey results for a Activity.
- Business Case: allows adding reasoning for initiating Activity.
- Confirmation / Result: allows defining planned and actual results of the Activity.
- Pricing: allows defining prices of different roles participating in the Activity.
- Assets: indicates information related to Assets of particular Activity. Click to add new Assets and fill information.
- Groups: allows grouping Activities.
- Revisions: allows seeing the history of actions taken with the Activity.
- Reminders: allows create reminder of activity finish date.
6. Available navigation buttons:
- Start recording: is used to start recording time spent working on Activity.
- Add new: is used to create new Activity.
- To list: is used to go to the list of Activities.
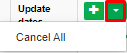
 : is used to create custom fields.
1. Press New Field to create field.
2. Fill in the field name.
3. Select field type.
4. Press Save to save field.
Create new Activity
To create new Activity follow these steps:
1. Go to tab Gantt in the Project form and click ![]() and select New Activity or go to Projects → Activities and in the list of Activities and click
and select New Activity or go to Projects → Activities and in the list of Activities and click ![]() .
.
2. Fill in fields in tab General:
- Title: Activity title indicates what Activity is about.
- Status: indicates what is the progress of Activity in terms of time, for example, “Planned”, “In progress”, “Done”, “Canceled” (list is taken from Settings → Dictionary → Activity → Status).
- Priority: indicates the priority of the Activity.
- Type: indicates what type is Activity, for example, Fix, Time & Materials or Discount. Type Discount allows to automatically add discount lines when Acceptance Certificate is generated from the list of Projects.
- Periodic: is used in action “Create periodic Activities” in the list of Projects. When button is turned ON, periodic Activities with the same title can be created.
- Auto-schedule: button sets the scheduling type of the Activity. When auto-schedule is enabled, dates of the activity will be updated automatically, if dates or duration of related activities are changed.
- Planned duration, d: planned duration of the Activity (in days). By default in new Activity forms planned duration is set to 1.
- Start date: start date of the Activity. If Activity is auto-scheduled field is inactive and is calculated automatically.
- Finish date: finish date of the Activity. If Activity is auto-scheduled field is inactive and is calculated automatically.
- Billable: fieldsets the status of the Activity in terms of finance if it can be billed. Availe options: Billable, Billable when done (time records related to activity will be added to Time report only when Activity status is Done), Not billable.
- Standard rate: standard rate of amount billed for single hour of the Activity without taxes.
- Amount: planned budget for Activity excluding taxes.
- Price: participant price of the Activity. This field is designed for training companies.
- Number: number of the Activity.
- Resources: resources that will be performing particular Activity. Resources that are indicated in this field are added to Activity’s budget and planned work indocated in field Work, h is assigned to each resource.
- Work, h: approximate time required to perform particular Activity.
- Groups: groups to which Activity is assigned.
- Progress: is used to indicate Activity progress during Activity execution. Indicated Activity progress percentage is presented in Project Gantt.
- Generate acceptance certificate: if button is turned ON, Acceptance certificate will be generated automatically after saving the Activity.
- Price type: define which prices have to be used (standard rate, rates defined in budget or prices defined in tab Pricing) when generating Time report.
- Account: Activity account (list is taken from Sales → Accounts).
- Related accounts: there is a possibility to define related Accounts that participate in a Activity. This field is designed for training companies.
- Project: indicates to what Project the Activity is related to.
- Revenue category: revenue category to which particular Activity is assigned.
- Owner: who will be responsible and accountable for this Activity (list is taken from Settings → Users).
- Executive: Activity Executive represents user who has ultimate responsibility for the Activity.
- Account owner: a person who is responsible for the management of sales and relationships with particular Account.
- Language: language in which particular Activity will be carried out. This field is designed for training companies.
- Country: country in which particular Activity will be carried out. This field is designed for training companies.
- City: city in which particular Activity will be carried out. This field is designed for training companies.
- Location: location in which particular Activity will be carried out. This field is designed for training companies.
- Room: room in which particular Activity will be carried out. This field is designed for training companies.
3.Click Save.
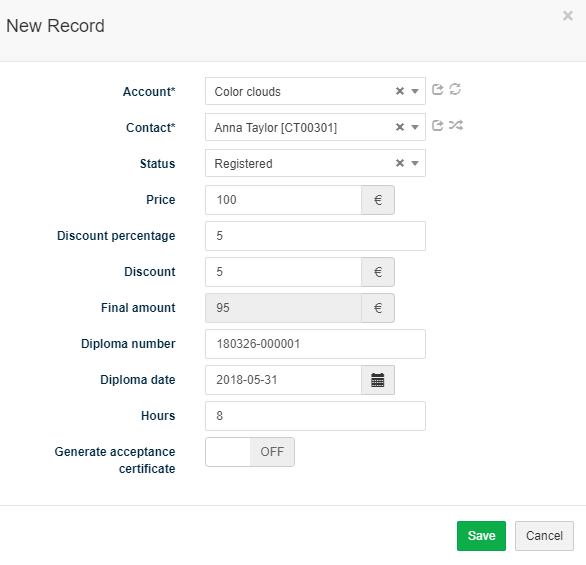
Add or import participants of the Activity
To add a participant of the acitivity follow these steps:
1. In tab Participants click ![]() .
.
2. Fill in fields:
- Contact: provides a list of Contacts assigned to particular Account.
- Status: status of participant.
- Price: price of the activity.
- Discount percentage: discount percentage.
- Discount: discount amount.
- Final amount: final amount of the Acitivity.
- Diploma number: number of the diploma.
- Diploma date: issue date of the diploma.
- Hours: duration of the Activity.
- Generate acceptance certificate: if turned ON, acceptance certificate will be generated automatically.
3. Click Save.
To import a list of participants from external file follow these steps:
1. In tab Participants click ![]() and select Import.
and select Import.
2. Create MS Excel file (format .xlsx) with importable columns: Contact, Account, Position, Phone, E-mail, Hours, Price, Status. Important! Do not change the structure of MS Excel file, do not add or delete columns.
3. Click Choose File and add a file with a list of partcipants.
4. Click Save.
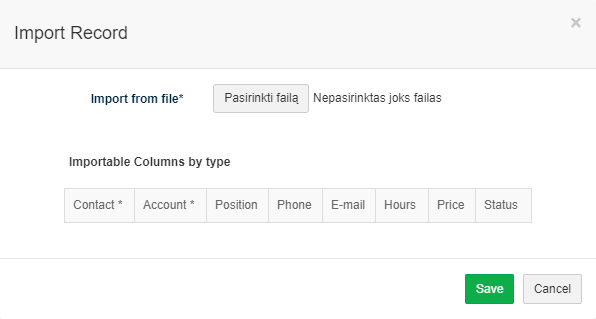
Hours and price will be set from Activity, if are not available in imported excel file.
1. In tab Participants click ![]() and select List. In next window show participants list who are in the activity.
and select List. In next window show participants list who are in the activity.
2. Click ![]() to add new participant in to the list. Account, Project and Activity fields fill automatically where participants list are assigned to.
to add new participant in to the list. Account, Project and Activity fields fill automatically where participants list are assigned to.
3. Select participants in the list and in the option bar click Send->Templates to Participants. Send templates to participants who have email.
4. Templates are used to create template for selected activities participants in the list.
Assign Acceptance certificate to Activity
To assign existent Acceptance Certificate to Activity follow these steps:
1. In tab Acceptance certificates click ![]() and select Assign.
and select Assign.
2. Choose related Acceptance certificate from the list.
3. Click Save.
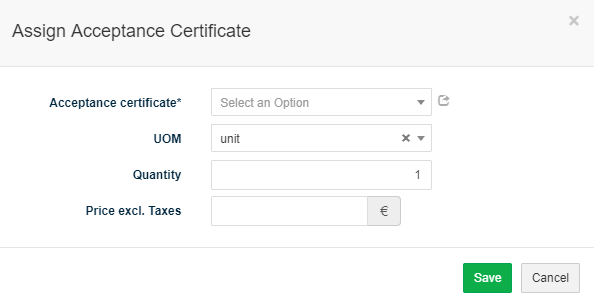
To create new Acceptance certificate click ![]() and fill in information.
and fill in information.
Create Task related to Activity
It is possible to create Tasks related to Activity in several locations of the system: Kanban window, Tasks list window, Activity form, Activities list window.
To create new Task related to Activity in the Activity form follow these steps:
1. In tab Tasks click ![]() .
.
2. Fill in Task’s information and click Save.
When task of activity is moved to waiting or done, activity status from Planned changes to In progress.
Generate a set of Tasks related to Activity (initiate Process)
It is possible to generate a set of Tasks related to Activity from a template (initiate a predefined process). To generate a set of Tasks related to Activity follow these steps:
- In tab Tasks click and select Process or in tab Process click
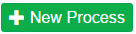 .
. - Select process template from the drop-down menu (list is taken from Settings → Processes).
- Define date when process should start / finish.
- Define date type: Start – First Task of the process will start on the indicated date, Finish – dates of the process Tasks will be defined so that the process would end on the indicated date. Important: there is a possibility to define process finish date only if process does not have decision tasks.
- Active Update dates option automatically updates tasks dates when changes in process task planned dates are made.
- Click Save.
It is possible to review the progress of initiated processes and number of Not Started, In Progress, Done and Cancelled Tasks in tab Process.
Add Activity budget
Activity budget can be formed of expenses related to T&M Activities, supplies and services purchased from third parties and work allocated to project resources (employees). Budget of each Project Activity is added to the overall Project budget. To add Activity budget follow these steps:
1. In the Activity form go to tab Budget.
2. To add new planned expense click ![]() in section Expenses and fill in expense information. Note: it is possible to add expenses only for T&M or FIX/T&M Activities:
in section Expenses and fill in expense information. Note: it is possible to add expenses only for T&M or FIX/T&M Activities:
- Title: indicate what the particular T&M Expense is.
- Status: indicate status of the T&M Expense (list is taken from Settings → Dictionary → Expenses →Status).
- Planned date: indicate planned date of expense.
- Expenditure date: indicate expenditure date.
- Planned cost amount: indicate planned value of the T&M Expense without taxes.
- Actual cost amount: indicate actual value of the expense without taxes.
- Tax: tax rate for the T&M Expense.
- Document number: indicate document number.
- Approval date: indicate approval date of expense.
- Approved by: indicate approval by of expense.
- Add to report: click ON to add to report.
- Supplier: indicate supplier of expense.
3. To allocate work (working hours) to resources click ![]() in section Work Resources and fill in information:
in section Work Resources and fill in information:
- Role: role assigned to particular resources. When role is selected, resources that are assigned to that role will be filterred out in the field Resourse and fields Standard rate and Cost will be filled automatically.
- Resource: resource assigned to the Project.
- Quantity: work quantity allocated to the resource.
- Standard rate: standard rate of amount billed for single hour of the Project without taxes. If pricing information according to different roles is added in Project’s or Activity’s tab Pricing, standard rate from this tab will be filled automatically after selecting role (if pricing information is defined in both Project’s and Activity’s tabs Pricing, information from Activity’s tab Pricing will be usedf). If there is no pricing information in tab Pricing, standard rate defined in resources form will be filled automatically after selecting a resource.
- Cost: amount that resource costs for single hour for the company.
- Create task: click ON to create task for resource.
- Comment: additional comment about resource assigned to Project.
4. To add new planned material resources click ![]() in section Material Resources and fill material resources information:
in section Material Resources and fill material resources information:
- Resource: resource assigned to the activity.
- Quantity: work quantity allocated to the resource.
- Actual quantity: work actual quantity allocated to the resource.
- Standart rate: standard rate of amount without taxes.
- Actual standart rate: actual standard rate of amount without taxes.
- Cost: amount that resource costs for the company.
- Actual cost: actual amount that resource costs for the company.
- Comment: additional comment about resource assigned to activity.
5. Click Save.
6. Repeat 2-5 until all expenses related to Activity (T&M expenses, work resources, material resources) are indicated.

After indicating all expenses you can see whether total sum do not exceeds planned Activity budget defined in field Amount. When Activity is in progress deviation between actual and planned amounts is shown. Red color of the deviation value indicates that actual amount exceeds planned amount. This allows you to track and control Activity budget.
There is also a possibility to import budget parts (T&M expenses, purchases and work allocation) from other Project. Click ![]() , select Import and define Project and Activity from which budget will be imported.
, select Import and define Project and Activity from which budget will be imported.
Review Tasks in a Gantt chart
There is a possibility to review Tasks related to specific Activity in a Gantt chart.

1. Tab Tasks Gantt provides a list of Tasks related to specific Activity and their visualization in a Gantt chart. dark green bars in the Gantt chart indicates planned Tasks, blue indicates Tasks that are in progress, light green indicates done Tasks. Available actions:
- Click button to add new Task.
- Click button
 to edit Task information.
 - Click button
 to mark Task as done.
 - Click button
 to delete Task.
2. It is possible to change time period showed on Gantt chart by clicking buttons.![]()
3. Button ![]() visualizes today’s date.
visualizes today’s date.
4. Button ![]() allows to add additional columns or hide unused information.
allows to add additional columns or hide unused information.
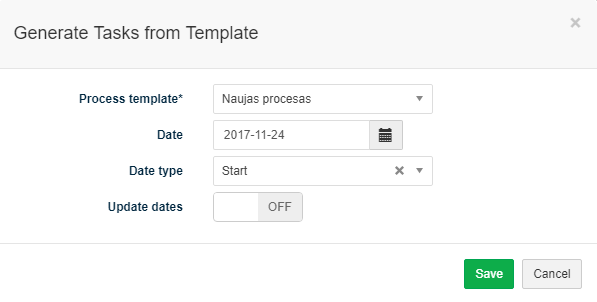
Create Survey related to activity
To create new Survey related to Activity follow these steps:
1. In the Survey click ![]() .
.
2. Fill in Survey information:
- Title: title of the Survey.
- Description: description of the Survey.
- Status: indicates status of the Survey (list is taken from Settings → Dictionary → Project → Status).
- Survey template: Select survey template from the drop-down menu (list is taken from Settings → Settings → Survey Templates).
- Project: indicate Project related to the Survey.
- Activity: indicate Activity related to the Survey.
- Owner: indicate who is responsible for this Survey (list is taken from Settings → Users).
- Start: indicate planned start of the Survey.
- Finish: indicate planned finish of the Survey.
- Actual start: indicate actual start of the Survey.
- Actual finish: indicate planned finish of the Survey.
- Respondents count: indicate the number of respondents for the Survey.
3. Click Save.
Fill in Survey Results related to Activity
To create new Survey related to Activity follow these steps:
1. In the Survey click ![]() .
.
2. Fill in Survey information:
- Title: title of the Survey.
- Description:description of the Survey.
- Status: indicates status of the Survey (list is taken from Settings → Dictionary → Project → Status).
- Survey template: Select survey template from the drop-down menu (list is taken from Settings → Settings → Survey Templates).
- Project: indicate Project related to the Survey.
- Activity: indicate Activity related to the Survey.
- Owner: indicate who is responsible for this Survey (list is taken from Settings → Users).
- Start: indicate planned start of the Survey.
- Finish: indicate planned finish of the Survey.
- Actual start: indicate actual start of the Survey.
- Actual finish: indicate planned finish of the Survey.
- Respondents count: indicate the number of respondents for the Survey.
3. Click Save.
If you already have created a survey, you can select survey, click ![]() and fill in survey results according to selected survey template:
and fill in survey results according to selected survey template:

Add Business Case information
Tab Business Case is used to capture the reasoning for initiating Activity. There is a possibility to define problem, current conditions, goal, problem analysis and proposal how to solve defined problem and achieve goal of the Activity.
To add Business Case information follow these steps:
1. In the Business Case click ![]() .
.
2. Fill in Business Case information:
- Problem: describe what problem you are trying to solve with an Activity being initiated.
- Current Conditions: describe current conditions to make the problem clear.
- Goal: define the goal of the Activity. State in measurable or identifiable terms.
- Analysis: describe root causes of the problem.
- Proposal: describe your proposed countermeasures for a problem.
Note: it is possible to add textual information and format it, add pictures, tables, links, etc. in every field.
3. Click Save.
This information will be included in A3 Report.
Define results of the Acitvity
Tab Confirmation / Result is used to define planned and actual results of the Activity:
- Output: any specific product that the Activity has to deliver, whether tangible or intangible. Outputs are commonly delivered after the end of the Activity.
- Outcome: is the result of the change derived from using the outputs of the Activity. Outcomes typically start to be achieved after the handover of the Activity’s outputs to users.
- Benefit: improvement resulting from an outcome. Benefits generally start to be achieved after the outcomes.
To add results of the Activity follow these steps:
1. In the Confirmation / Result tab click ![]() .
.
2. Fill in information of new result (minimum required information is type and title):
- Type: select type of the result (output. outcome or benefit).
- Title: title of the result.
- UOM: unit of measurement.
- Expected value: expected value of the result.
- Tolerance: describe your proposed countermeasures for a problem.
- Evaluation date: date when defined result should be evaluated.
- Actual value: actual value of the result.
3. Click Save.

This information will be included in A3 Report.
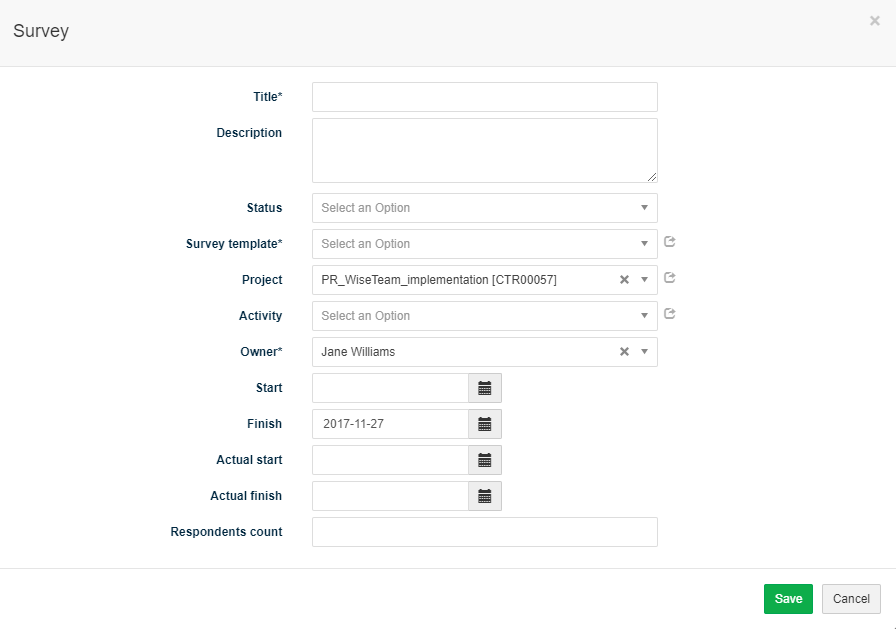
Define prices of roles participating in an Activity
To define a price of a role participating in a Project follow these steps:
1. In tab Pricing click ![]() .
.
2. Select role, define price, start and finish dates, add description and click Save.
These prices will be assigned to Resources added to Activity budget according to their roles. If prices are not specified in tab Pricing, standard rates defined in Resources form will be used.
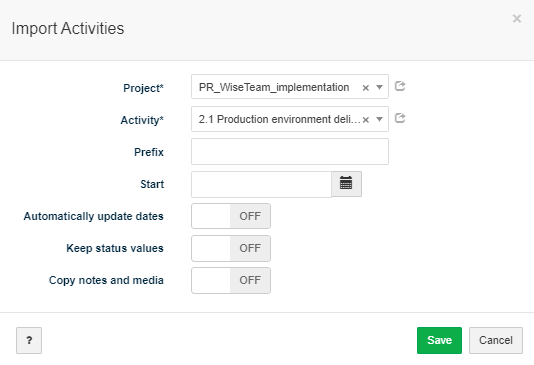
Import Activities from other Project
There is a possibility to import children activities (Activities that in a WBS structure are in a lower level) from other Projects in order to simplify the process of creating new Activities. To import Activities follow these steps:
1. In Activity form click button ![]() and select Import Activities.
and select Import Activities.
2. Select Project and parent Activity to which related children Activities should be copied and assigned to the Activity being edited, select whether automatically update dates, to keep status values and copy notes and media and click Save.
Generate A3 Report
A3 is a one-page report used that can be used for documenting the necessary information of the Activity for decision making and progress reporting. A3 Report include:
- Problem, Current Conditions, Goal, Analysis, Proposal: a description of the problem you are trying to solve with an Activity being initiated, current situation, goal, analysis performed to determine root causes of the problem and proposed solutions for the problem taken from tab Business Case.
- Plan: related Tasks, their completion status, due dates, responsibilities, and notes. This section of the report provides activity progress information.Tasks are included in the report according to the parameters defined before generating the report (report time period, choice of whether to include late Tasks).
- Results: the list of planned Project outputs, outcomes and benefits taken from tab Confirmation / Result.
To generate A3 Report follow these steps:
1. In Project form click button Report and select A3 Report.
2. Indicate start and finish dates, choose whether to include task owners, late tasks and click Save.
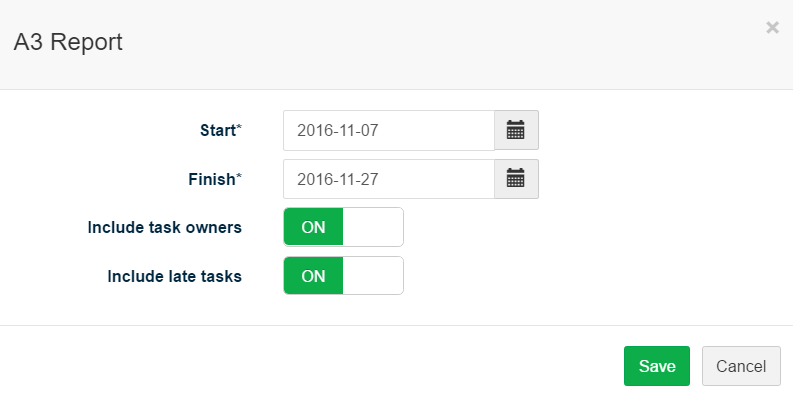
3. Save the generated PDF file.
Perform actions in the list of Activities

1. As in all lists, you can work with Activities by using standard functionality buttons: filter Activities, add new Activity, change table properties, search Activities, narrow or extend information viewable in table cells, edit or add additional information to the Activity, delete Activity from the list.
2. It is possible to see how many related Not Started, In Progress, Waiting, Done or Cancelled tasks Activity has.
3. It is possible to perform actions with Activities in the list without opening the entries. After selecting single or multiple Activities by marking lines ![]() or selecting all Activities by clicking
or selecting all Activities by clicking ![]() button available actions are:
button available actions are:
- Export records: is used to export selected Activities to MS Excel file.
- Set Status: is used to set status of selected Activities.
- Set Priority: is used to set priority of selected Activities.
- Set Price type: is used to set price type of selected Activities.
- Set Owner: is used to assign new Owner to selected Activities.
- Set Account Owner: is used to assign new Account Owner to selected Activities.
- Set Executive: is used to assign new Executive to selected Activities.
- Set Task priority: is used to set priority of Tasks related to selected Activities.
- Set Project: is used to set project of selected Activities.
- Set Groups: is used to set up a group for selected Activities.
- Set Type: is used to set type of selected Activities.
- Create Budget: is used to create budget of activity from tasks.
- Create Task: is used to create new Task related to selected Activities. In case several Activities are selected several Tasks will be created.
- Create Activities: is used to import activities from other Project. After selecting Project and parent activity, children activities of the selected parent activity will be copied to the selected Activities. There is a possibility to define prefix that will be added to the imported activities, define start date of the activities, choose whether to keep status values, copy notes and media, automatically update dates.