Navigation: Settings → Users
Option is used to manage Users that have access to WiseTeam.
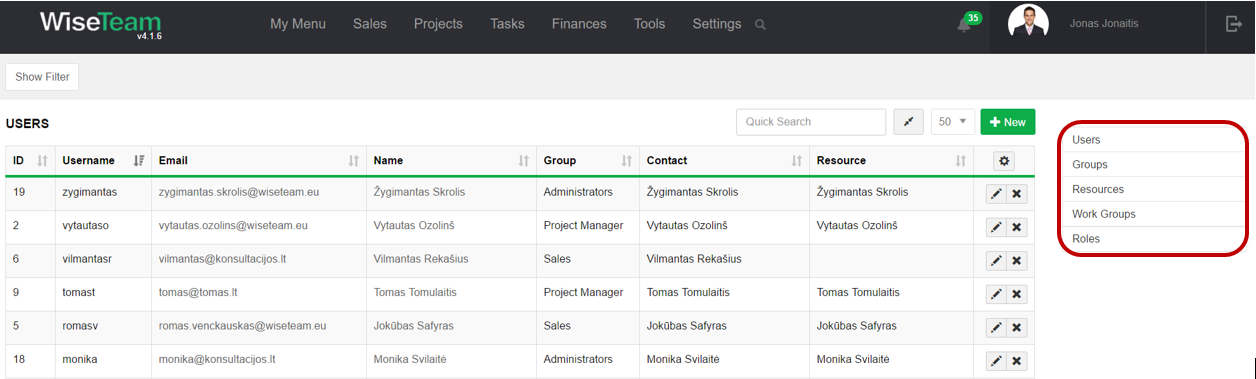
Review available user settings groups
Users list page contains four parts:
1. Users: Users’ that provide information about each individual.There is a possibility to create new User in two parts of WiseTeam: Users’ list or Account form.
2. Groups: a list of groups that provide information about access rights.This option allows creating new groups with particular access rights, editing existent groups.
3. Resources: Resources indicate information about disposable physical or human resources that are used in Projects budged as a work input.
4. Work groups: a list of Work groups that are displayed in Kanban window. This option allows grouping Users into particular Work groups, e. g. departments, project teams, creating new Work groups.
5. Roles: a list of positions that can be assigned to Users.
Create new User in the list of Users
To create new User, a Contact has to be created and assigned to your company’s Account.
To create new User in the list of Users follow these steps:
1. Go to Settings → Users.
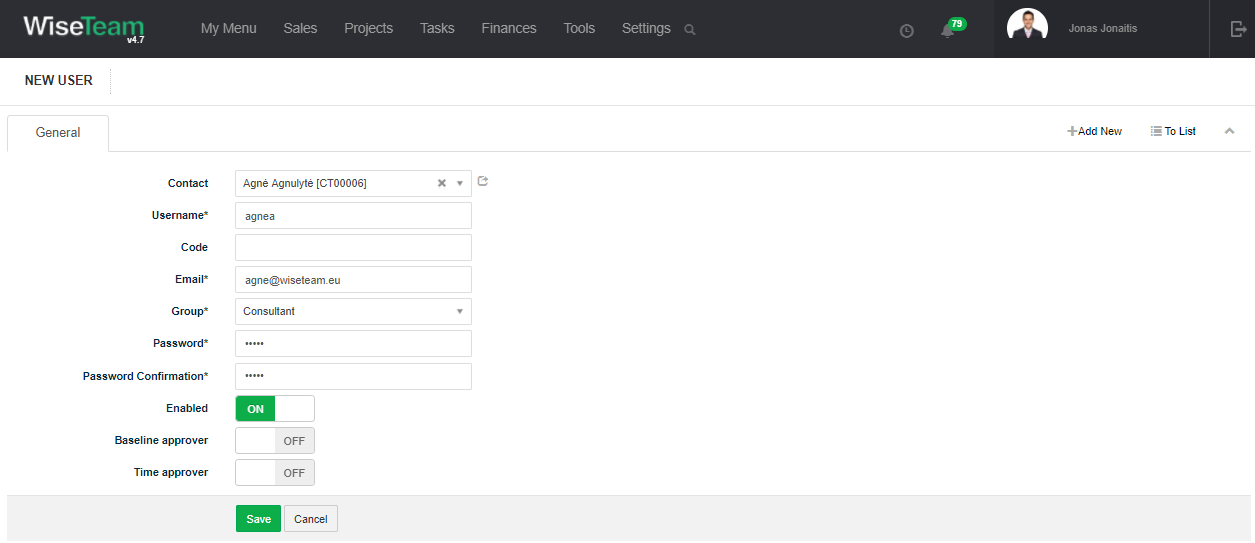
2. Click ![]() button to add new User and fill in User’s information:
button to add new User and fill in User’s information:
- Contact: select Contact from drop down list. If Contact does not exist click
 button, fill in Contact’s information and click Save . Then go to tab Accounts and assign your company’s Account.
 - Username: username that the User will be using to login to the system.
- Code: combination of code and/or user name can be used in the owner fields (owner format can be set in Settings → Settings → User label format).
- Email: user’s email address.
- Group: group defining user access rights.
- Password: chosen password for the user.
- Password Confirmation: required additional password entry for validation.
- Enabled: ON allows user login to WiseTeam. OFF – disables user from logging into WiseTeam. Between the user and the resource are synchronization.
- Baseline approver: Select ON if User has the right to approve baselines.
- Time approver: if enabled, Resource cal approve all Time records.
3. Click Save.
4. Generate User’s resource by clicking button ![]() .
.
5. After generating the Resource assign User to a Work group. Go to tab Work Groups in the form of the User, click ![]() , select Work group from the drop down list, define whether the Work group is primary User’s work group and click Save.
, select Work group from the drop down list, define whether the Work group is primary User’s work group and click Save.
6. Click button ![]() and define Resource’s information:
and define Resource’s information:
- Uom: set resource uom.
- Currency: set resource currency.
- Max workload per month, d: max Reource’s workload per month in days.
- Max workload per day, h: max Resource;s workload per day in hours.
- Enabled: ON enables Resource. OFF – disables Resource.
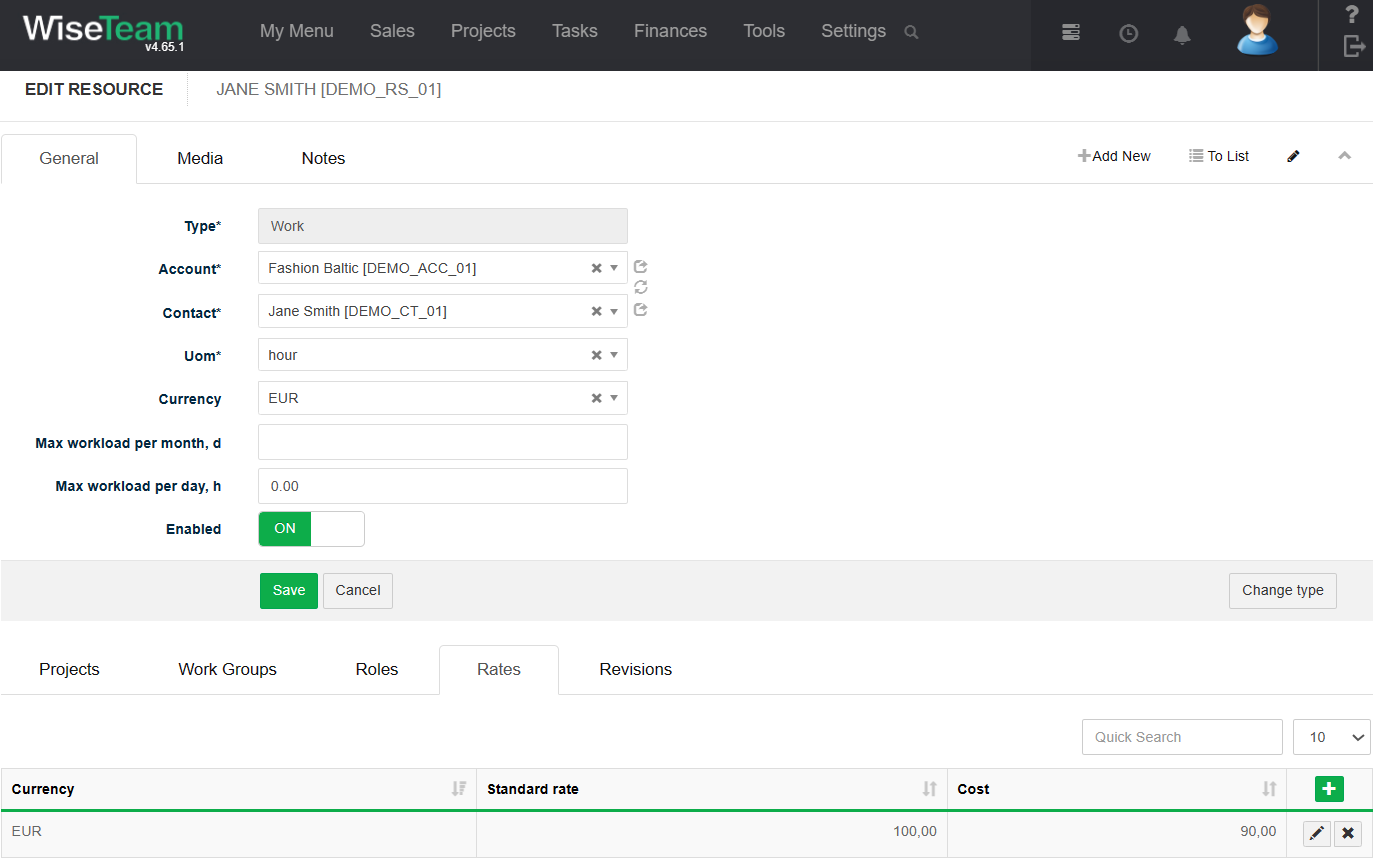
7. Click Save.
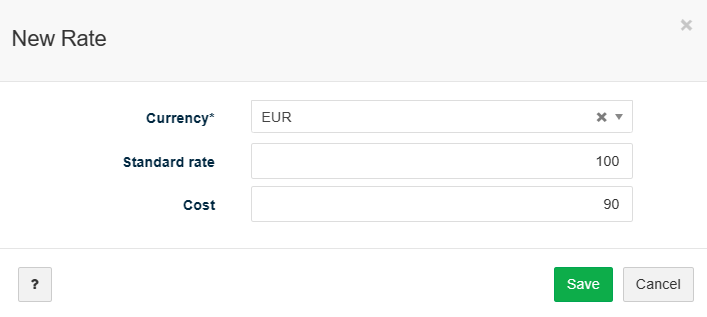
Resource standard rate and cost need to set in the Rates tab.
- Standard rate: rate of amount billed for single unit of measurement for Resource without taxes.
- Cost: cost for single unit of measurement for Resource without taxes.
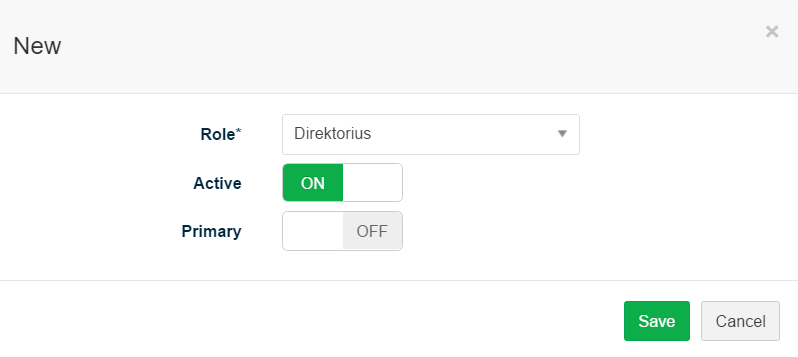
8. Go to tab Roles and click ![]() to assign a role. Define whether role is active and whether role is primary Resource’s role.
to assign a role. Define whether role is active and whether role is primary Resource’s role.
Create new User in Account form
To create new User a Contact has to be created and assigned to your company’s Account.
To create new User in the Account form follow these steps (steps are defined assuming that Contact does not exit. If Contact already exist, omit 3-4 steps):
1. Go to Sales → Accounts and open your Account’s form.
2. Go to tab Contacts.
3. Click ![]() button to add new Contact and fill in Contact’s information:
button to add new Contact and fill in Contact’s information:
- Name: Name and Surname of the Contact.
- Owner: user responsible and accountable for the Contact, filled in automatically.
- Position: Contacts’ position in a company.
- Primary contact: turn ON if Contact is primary contact person of the Account.
- Main company: turn ON if Account is main Contact’s company.
- Status: Contact’s status in a company (Contact’s status have to be Active to create User).
- Communications: contact information.
- Groups: Contact group.
4. Click Save.
5. Click ![]() button and select Create User.
button and select Create User.
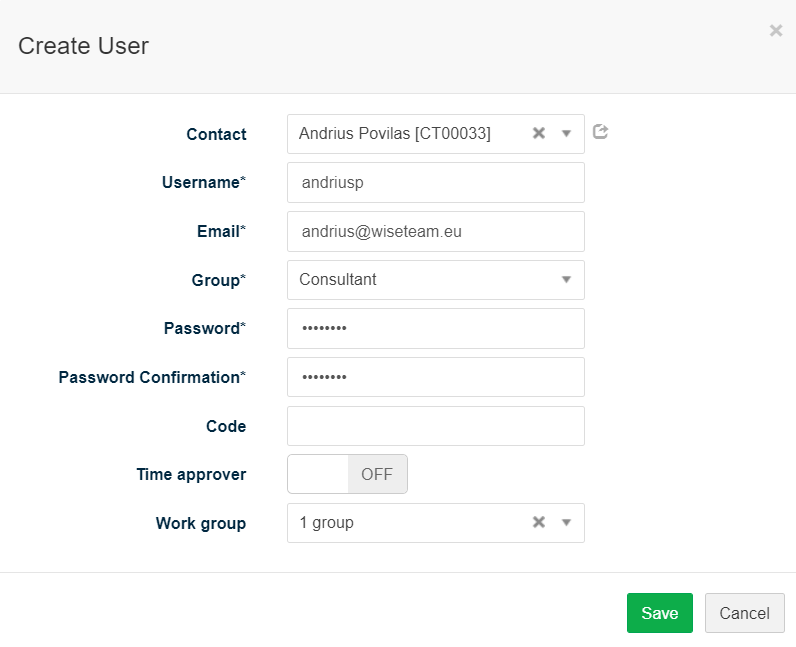
6. Fill in User’s information:
- Contact: User Contact, used in the system, filled automatically.
- Username: username that the User will be using to login to the system.
- Email: user’s e-mail address.
- Group: group defining user access rights.
- Password: chosen password for the user.
- Password Confirmation: required additional password entry for validation.
- Code: combination of code and/or user name can be used in the owner fields (owner format can be set in Settings → Settings → User label format).
- Time approver: if enabled, Resource cal approve all Time records.
- Work group: work group to which User has to be assigned.
7. Click Save.
8. Click ![]() button and select Edit User .
button and select Edit User .
9. Click button ![]() and define Resource’s information:
and define Resource’s information:
- Standard rate: rate of amount billed for single unit of measurement for Resource without taxes.
- Cost: cost for single unit of measurement for Resource without taxes.
- Max workload per month, d: max Reource’s workload per month in days.
- Max workload per day, h: max Resource;s workload per day in hours.
- Enabled: ON enables Resource. OFF – disables Resource.
10. Click Save.
11. Go to tab Roles and click ![]() to assign a role. Define whether role is active and whether role is primary Resource’s role.
to assign a role. Define whether role is active and whether role is primary Resource’s role.
Change User settings
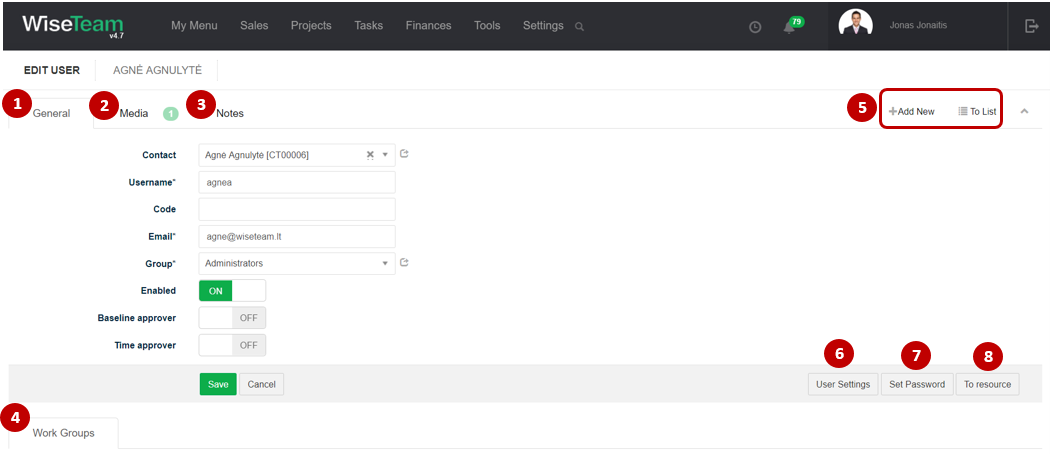
1. General information about User is provided in tab General. You have to fill in this information when creating new User.
2. In tab Media it is possible to attach files. Click Select Files or do Drag & Drop.
3. In tab Notes it is possible to leave notes. Click Add note to create new note.
4. Available Info Tabs:
- Work Groups: it is possible to create new Work Group.
5. Available navigation buttons:
- Add new: is used to create new User.
- To list: is used to go to the list of Users.
6. In tab User Settings it is possible to change User settings.
7. In tab Set Password it is possible to set password to User.
8. In tab To resource it is possible to go to User’s resource.
To change User’s settings follow these steps:
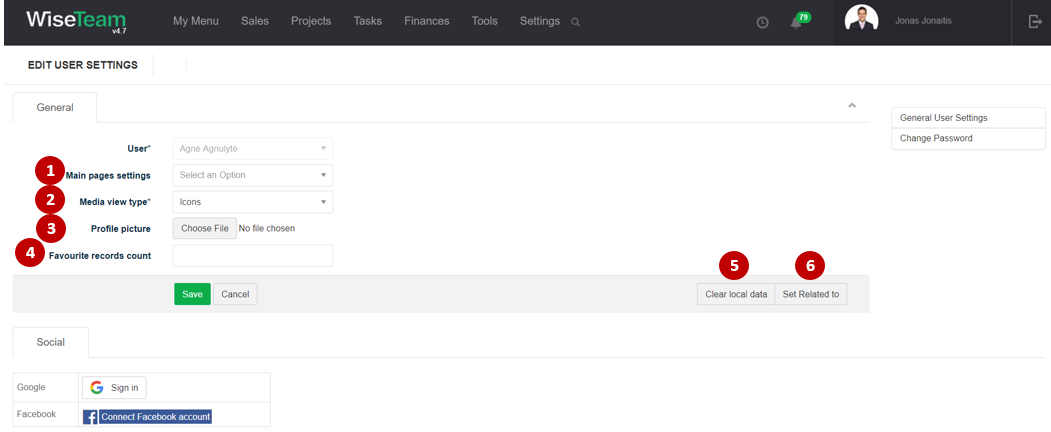
Go to Settings → Users, select User, open User’s form and click button ![]() .
.
1. In field Main page settings select main page for the User.
2. Define how media should be showed for the user: as a list or icons.
3. Add User’s profile picture.
4. In field Favourite records count define the number of favourites records that will be showed in Kanban window.
5. Button Clear local data is used to clear User’s local data.
6. Button Set Related to is used to set an object that will be filled by default in Related to field when creating new Task.
Create new access rights group
To create new access rights group follow these steps:
1. Go to Settings → Users → Groups.
2. Click button ![]() .
.
3. In tab General fill in group’s information:
- Name: name of the access rights group.
- Roles: possible roles chosen for the user group.
- Show in owner list: if chosen ON group users are shown all over WiseTeam in owner lists.
4. Click Save.
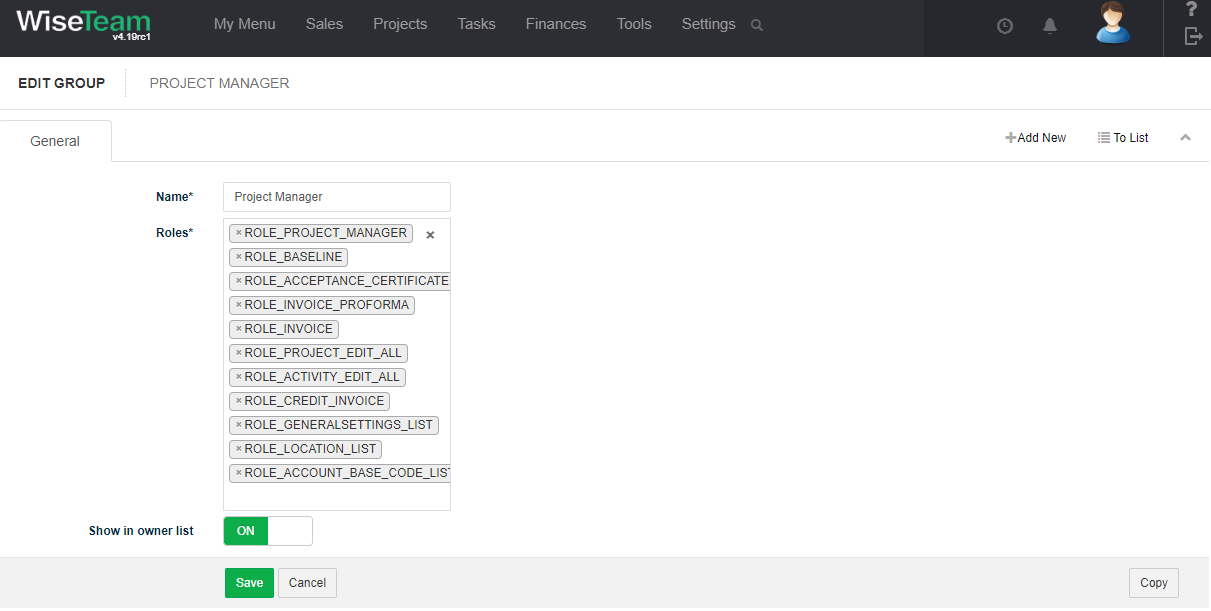
It is possible to copy a group with existing roles.
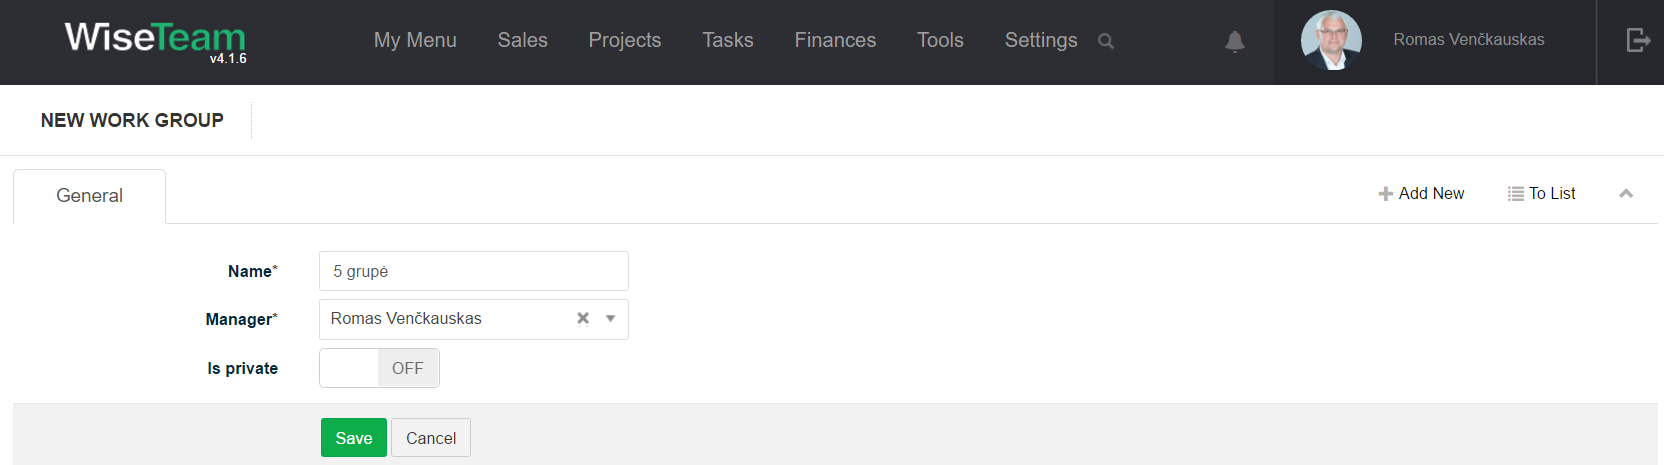
Create new work group
To create new Work group follow these steps:
1. Go to Settings → Users → Work Groups.
2. Click ![]() button.
button.
3. In tab General fill in name, select manager of the Work group.
4. Turn button Is private ON, if you want that other Users would not see this work group in Kanban and Timesheet windows.
5. Click Save.
5. In tab Resources click ![]() button and select Assign, select User from drop down list, define whether the Work group is primary User’s work group and click Save or click
button and select Assign, select User from drop down list, define whether the Work group is primary User’s work group and click Save or click ![]() button and select Assign unassigned that automatically assigns Users that are not assigned to any Work group.
button and select Assign unassigned that automatically assigns Users that are not assigned to any Work group.
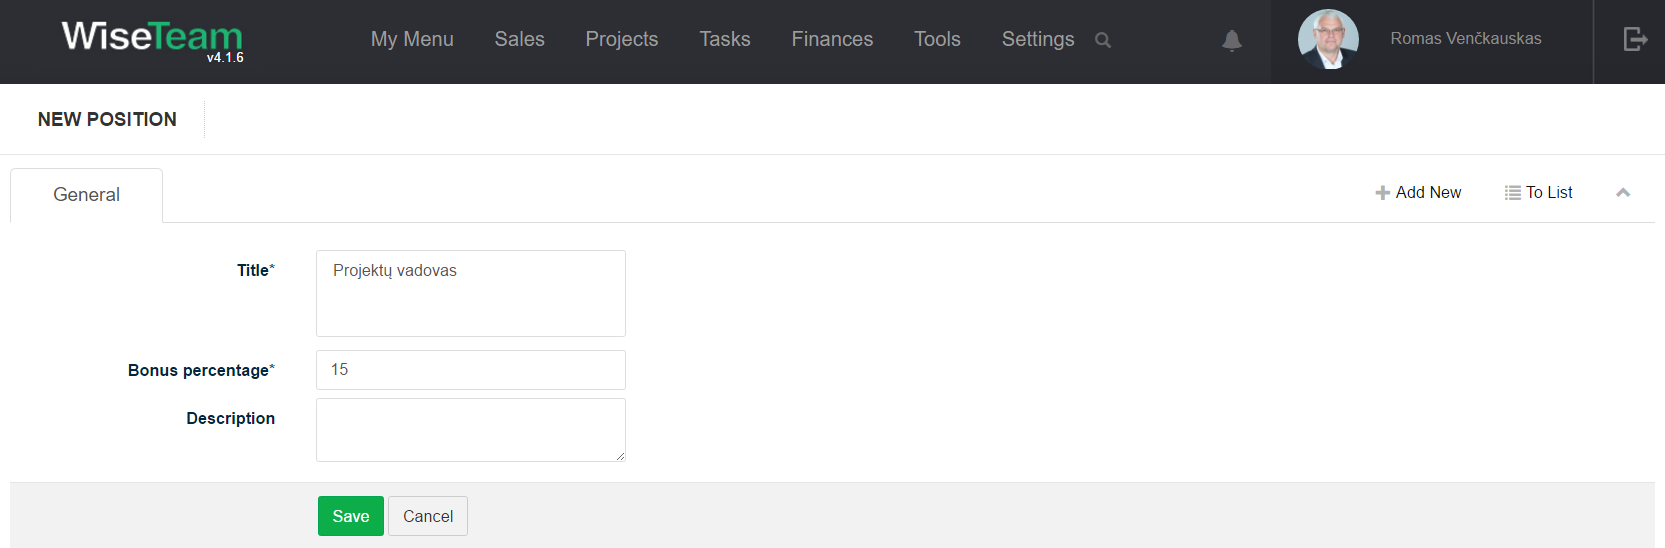
Create new role
To create new Role follow these steps:
1. Go to Settings → Users → Roles.
2. Click ![]() button.
button.
3. In tab General fill in title, bonus percentage of the role and description.
4. Click Save.
Perform action in the list of Users list
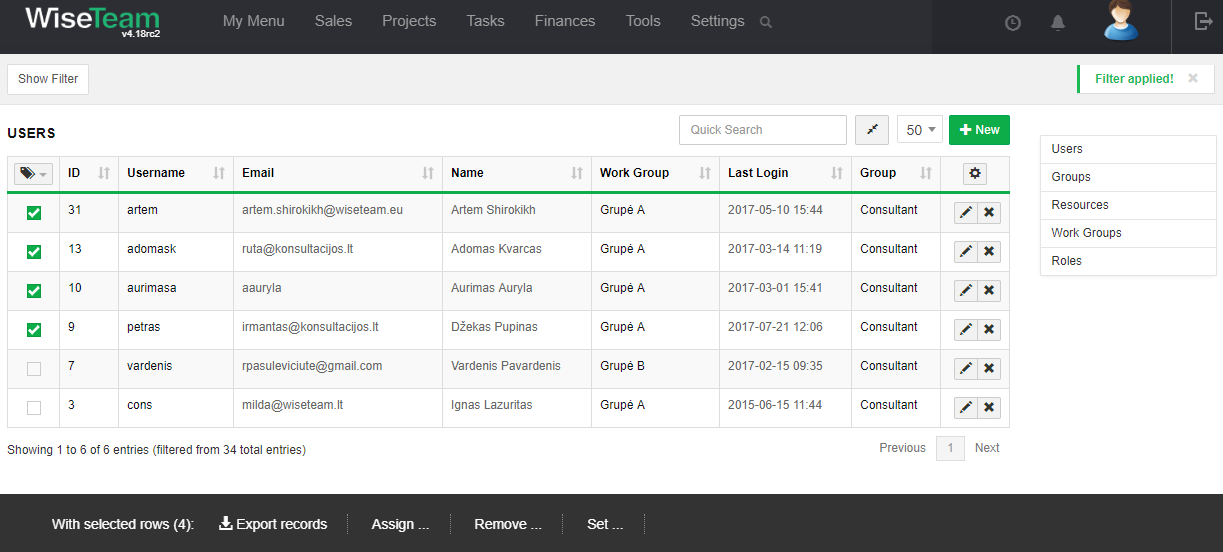
It is possible to perform actions with Users in the list without opening the entries. After selecting single or multiple Users by marking lines ![]() or selecting all Users by clicking
or selecting all Users by clicking ![]() button available actions are:
button available actions are:
Export records: is used to data export in the Excel format.
Assign Work group: is used to assign work group to selected users.
Remove Work group: is used to remove work group to selected users.
Set Group: is used to set a group for selected users in the list.