Navigation: Finances → Invoices
Invoices indicate information about client invoiced acceptance certificates.
Review Invoice form
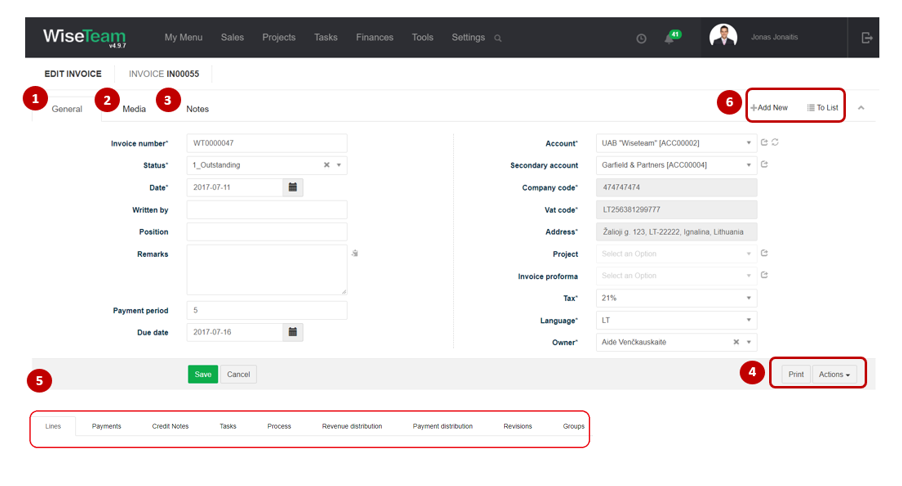
1. General information about Invoice is provided in tab General. You have to fill in this information when creating new Invoice.
2. In tab Media it is possible to attach files. Click Select Files or do Drag & Drop.
3. In tab Notes it is possible to leave notes. Click Add note to create new note.
4. Actions that can be taken with Invoice:
- Template: allows printing Invoice according to selected template. To perform this action a template has to added in Settings → Settings → Templates.
- Print: generates filled PDF version of invoice that is ready to be printed.
- Update account: updates Invoice account with final related data (company code, Vat code, address).
- Copy: creates copy of the opened Invoice. Only difference is subsequent Invoice number.
- Send: sends emails with Invoice to client.
- Create Credit Note: creates credit note for an issued Invoice.
- To Time report: open Time report from which Invoice was generated.
5. Available Info Tabs:
- Lines: Invoice parts (lines) that were established in the contract or Acceptance Certificate. Click
 to create new line and provide the required information.
 - Payments: information about planned and received payments regarding provided services for clients. Red colored lines means that the payment is not yet received. Click to create new Payment and provide information or click
 to:
to:
- assign existing payment.
- import payments form related Pro forma Invoice.
- Credit Notes: a list of Credit Invoices. Click or select Create Credit Note from the available actions.
- Tasks: list of Tasks related to Invoice. Click to add new Task or and select Process to generate Tasks from a template.
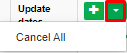
- Process: allows initiating processes and seeing the progress of initiated processes. If multiple processes are running, you can cancel active processes with Cancel all at the same time,
 .
. - Triggers: allows seeing and adding Task triggers related to this Task.
- Revenue distribution: information about revenue distribution to resource. Click
 to create New Revenue Distribution. Information is automatically filled if generated from the time report.
 - Payment distribution: information about payment distribution for resource. Information is automatically filled when created payment.
- Revisions: history of actions taken with the Invoice.
- Groups: allows grouping Invoices according to types determined (list is taken from Settings → Groups).
- Mail: allows seeing, creating and assigning related emails. Click create new Mail. Click to assign other mails.
6. Available navigation buttons:
- Add new: is used to create new Invoice.
- To list: is used to go to the list of Invoices.
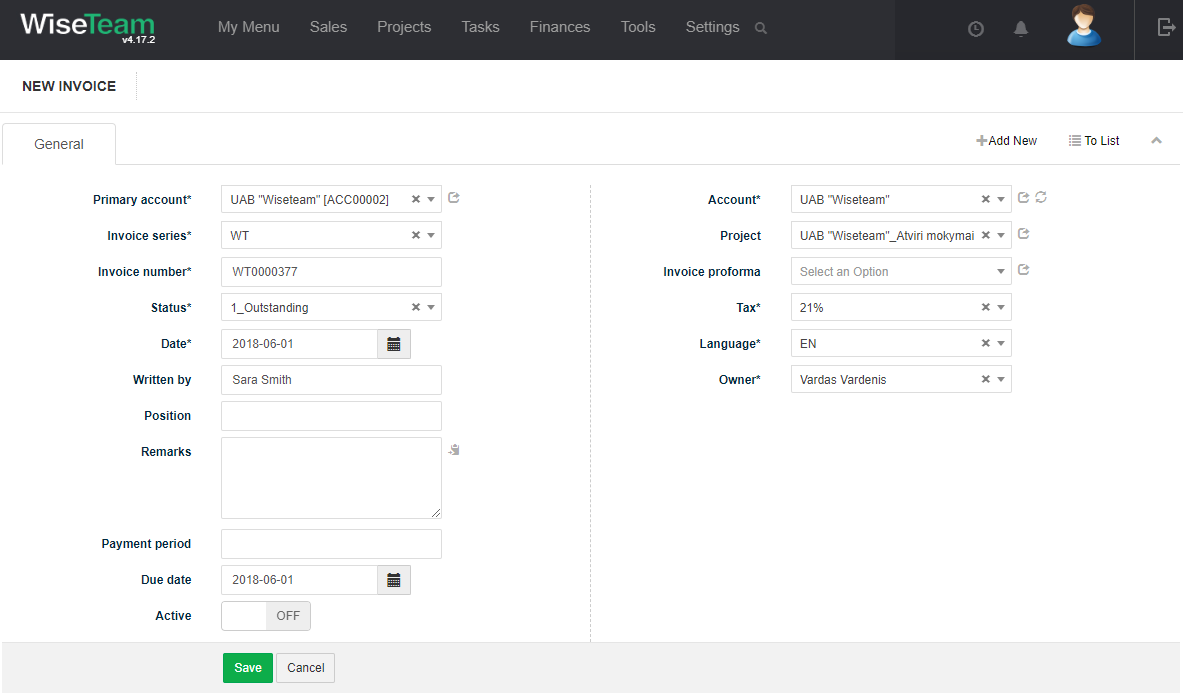
Create new Invoice
To create new Invoice follow these steps:
1. Go to Finances → Invoices and in the list of Invoices click ![]() .
.
2. Fill in fields in tab General:
- Primary account: field is displayed if there are multiple active Primary Accounts (defined in Settings → Dictionary → Acceptance Certificate → Status).
- Invoice series: defines prefix used in Invoice number.
- Invoice Number: automatically generated number, if required number can be changed manually.
- Status: indicates the progress of the Invoice (list is taken from Settings → Dictionary → Invoices → Status). Status is updated according to Invoice Amounts.
- Date: date when the Invoice was issued. Automatically generates the current date. Invoice date must be greater or equal to the last Invoice’s date.
- Written by: indicates information about person who had created the Invoice. By default it is the user who is logged in, if required can be manually changed.
- Position: indicates information about person’s position that had created the Invoice. By default it is the position of the user who is logged in, if required can be manually changed.
- Remarks: notes that are related to the Invoice.
- Payment period: payment period filled automatically according to payment period defined in a related Project’s form. If payment period is not defined in Project’s forms, default payment period defined in Settings will be filled.
- Due date: payment due date. Calculated automatically according to Invoice creation date and payment period.
- Account: indicates the Account that the Invoice is being written for.
- Project: should be filled if Invoice is related to Project of the previous stated Account.
- Invoice proforma: a relation to Pro Forma Invoice. When Invoice generated from Pro Forma Invoice, filled automatically.
- Tax: tax rate for the Invoice.
- Language: indicates language in which PDF version of Invoice that is ready to be printed have to be generated. Language is set according to Account language when Account is selected.
- Owner: user that created Invoice record.
3. Click Save.
It is also possible to generate Invoice from related Acceptance certificate or Time Report. To do this go to the form of related Acceptance Certificate and click button Create Invoice or go to the related Time Report and click button Generate Invoice.
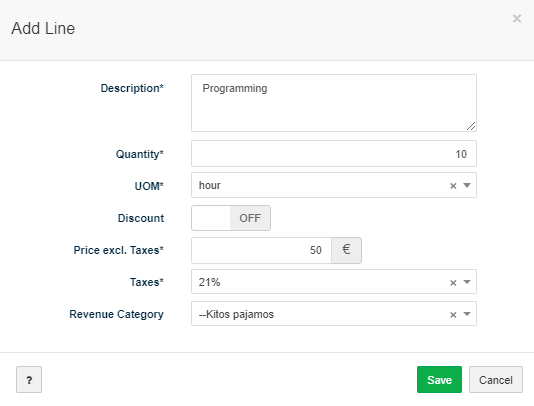
Add Invoice line
To add Invoice line follow these steps:
1. In tab Lines click ![]() .
.
2. Fill in Line information:
- Description: description of the provided services, products.
- Quantity: quantity of units of measurements.
- UOM: unit of measurement.
- Discount: turn button ON, if it is a discount line. active discount allows to add negative Price excl. Taxes.
- Price excl. Taxes: price excluding taxes.
- Taxes: tax used for invoice line.
- Revenue Category: revenue category to which this invoice line should be assigned.
3. Click Save.
In case Invoice is generated from related Acceptance certificate Invoice lines will be automatically copied from Acceptance certificate. In case Invoice is generated from the Time Report Invoice line with the Time Report Amount will be automatically added to the Invoice.
There is a possibility to assign several Acceptance Certificates and Time Reports or to generate Invoice’s lines from fix type billable Activities. To assign Acceptance certificate, Time report or to generate line from fix type Activity click button ![]() and select Acceptance certificate, Time Report or Activity. When adding lines from Time reports and Activities there is a possibility to group Invoice’s lines by revenue category. In this case Lines with revenue categories’ titles will be generated.
and select Acceptance certificate, Time Report or Activity. When adding lines from Time reports and Activities there is a possibility to group Invoice’s lines by revenue category. In this case Lines with revenue categories’ titles will be generated.
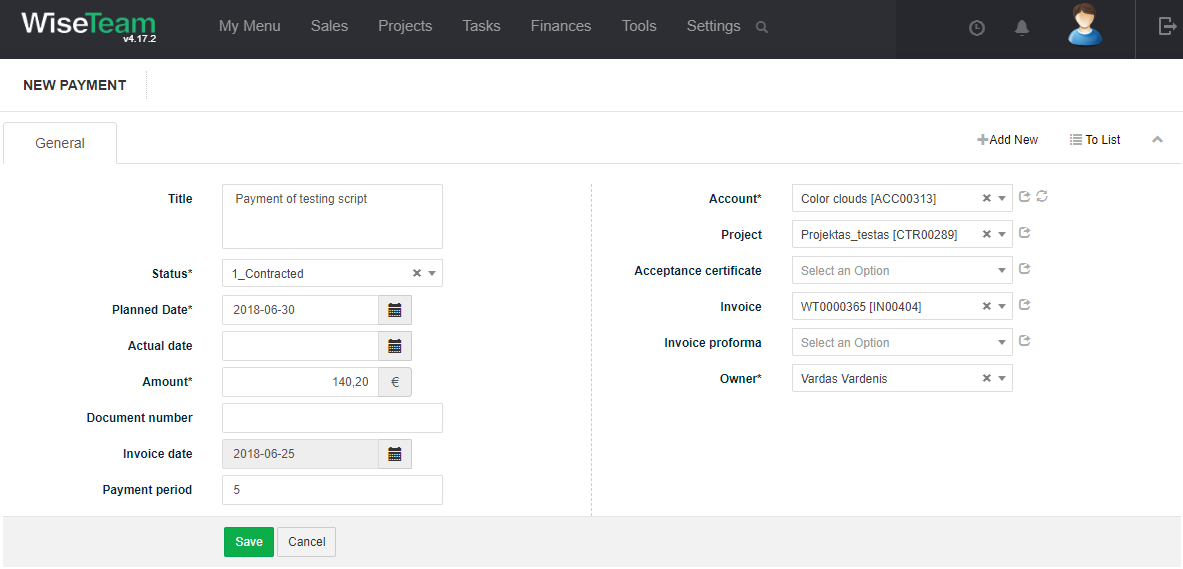
Add new Payment
There is a possibility to create new related Payment or assign existent Payment.
To add new Payment follow these steps:
1. In tab Payments click ![]() .
.
2. Fill in Payment information:
- Title: indicates what particular payment is about.
- Status: indicates what is the progress of a payment (list is taken from Settings → Dictionary → Payments → Status).
- Planned date: indicates planned date of the payment.
- Actual date: indicates date when the payment was received.
- Amount: indicates full amount of payment including taxes
- Document number: indicates unique document number.
- Invoice date: indicates invoice date.
- Payment period: indicates payment period.
- Account: Payment account (list is taken from Sales → Accounts), when creating Payment from Invoice form filled automatically.
- Project: indicates related Project to particular Payment. (list is taken from Project → Project).
- Acceptance certificate: indicates related Acceptance Certificate to particular Payment (list is taken from Finances → Acceptance Certificates).
- Invoice: indicates related Invoice to particular Payment ( list is taken from Finances → Invoices), when creating Payment from Invoice form filled automatically.
- Invoice Proforma: indicates related Pro Forma Invoice to particular Payment (list is taken from Finances → Pro Forma Invoices).
- Owner: indicates owner of payment.
3. Click Save.
To assign existent Payment follow these steps:
1. In tab Payments click ![]() to Assign.
to Assign.
2. Select related Payment from the list.
3. Click Save.

Create Task related to Invoice
It is possible to create Tasks related to Invoice in several locations of the system: Kanban window, Tasks list window, Invoice form, Invoices list window.
To create new Task related to Invoice in the Invoice form follow these steps:
1. In tab Tasks click ![]() .
.
2. Fill in Task’s information and click Save.
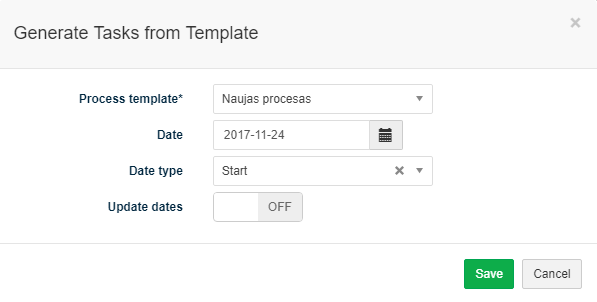
Generate a set of Tasks related to Invoice (initiate Process)
It is possible to generate a set of Tasks related to Invoice from a template (initiate a predefined process). To generate a set of Tasks related to Invoice follow these steps:
- In tab Tasks click and select Process or in tab Process click
 .
. - Select process template from the drop-down menu (list is taken from Settings → Processes).
- Define date when process should start / finish.
- Define date type: Start – First Task of the process will start on the indicated date, Finish – dates of the process Tasks will be defined so that the process would end on the indicated date. Important: there is a possibility to define process finish date only if process does not have decision tasks.
- Active Update dates option automatically updates tasks dates when changes in process task planned dates are made.
- Click Save.
Send Invoice to client
It is possible to send email to client with attached Invoice and related, if exist, Time report. To send Invoice email follow these steps:
1. Click button Actions and select Send.
2. Fill in fields:
- Email: field is filled automatically with email of the Contacts of Project Account that have attribute Send invoice email turned ON (Contacts that have to get Invoice emails are defined in Account → tab Contacts → button Send invoice email ). Additional emails can be added if needed (it is not possible to add additional emails when email is sent from the list of Invoices to different Accounts).
- Subject: email subject.
- Attach time report: turn button ON, if you want to attach related Time report.
- Template: to fill email text automatically choose email template or enter text manually. To use template it has to be added in Settings → Settings → Templates.
- Time report export type: if Time report has to be attached, choose whether to attach full form or short form of Time report.
- Attachments: used to attach files from folders.
3. Click Save.

Perform actions in the list of Invoices
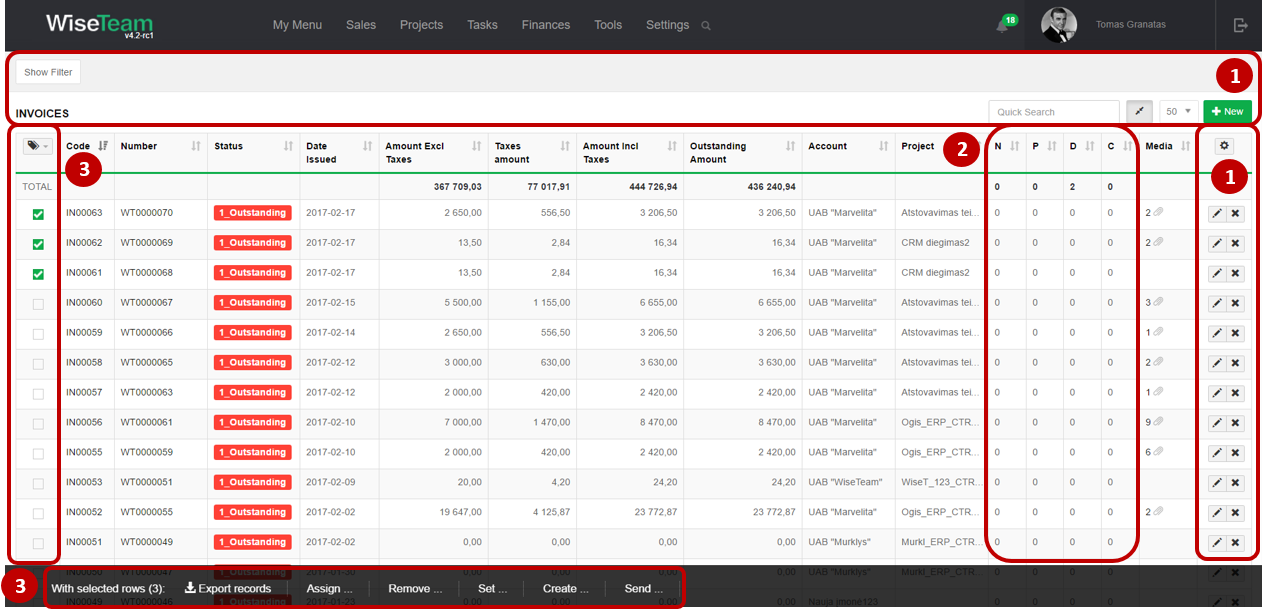
1. As in all lists, you can work with Invoices by using standard functionality buttons: filter Invoices, add new Invoice, change table properties, search Invoices, narrow or extend information viewable in table cells, edit or add additional information to the Invoice, delete Invoice from the list.
2. It is possible to see how many related Not Started, In Progress, Waiting, Done or Cancelled tasks Invoice has.
3. It is possible to perform actions with Invoices in the list without opening the entries. After selecting single or multiple Invoices by marking lines ![]() or selecting all Invoices by clicking
or selecting all Invoices by clicking ![]() button available actions are:
button available actions are:
- Export records: is used to export selected Invoices to MS Excel file.
- Set Status: is used to set status of selected Invoices.
- Set Owner: is used to set owner of selected Invoices.
- Set Groups: is used to set up a group for selected Invoices.
- Create Task: is used to create new Task related to selected Invoices. In case several Invoices are selected several Tasks will be created.
- Send Invoice: is used to send selected Invoices to clients. Add subject and body of email or select a template from the list, define whether to send related Time report and its form and click Save. Emails with selected Invoices will be send to the Contacts of the Project Account that have attribute Send invoice email turned ON (Contacts that have to get Invoice emails are defined in Account → tab Contacts → button Send invoice email ). There is a possibility to choose whether to group Invoices of the same Account or not. If you want that Invoices of the same Account would be sent in one letter turn button Group invoices by account ON.