Navigation: Sales → Opportunities
An Opportunity is a contact or an account which has been qualified and its need is known.
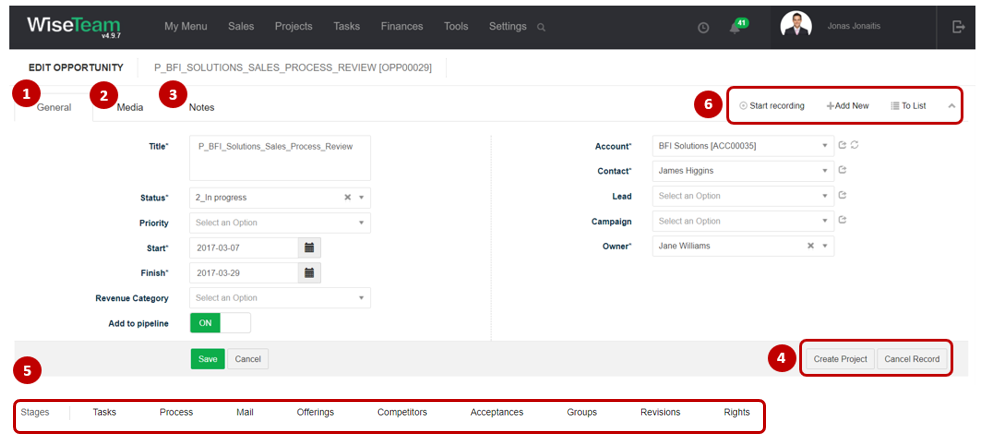
Review Opportunity form
1. General information about Opportunity is provided in tab General. You have to fill in this information when creating new Opportunity.
2. In tab Media it is possible to attach files. Press Select Files or do Drag & Drop.
3. In tab Notes it is possible to leave notes. Press Add note to create new note.
4. Actions that can be taken with Opportunity:
- Create Project: as soon as appears legal agreement, Opportunity can be turned into Project.
- Cancel record: allows canceling Opportunity record and all related tasks that are planned or in progress. When the record is canceled, opens the modal window of the record with the reason and end date fields. Also aption to enter Reopen date. The cancelled opportunity will open for the specified date in the stage that will be defined in the system setup (Settings → Dictionary →Opportunity stages). When a opportunity is canceled, it can be opened manually by pressing the
 . The opportunity opens in a stage that has a set parameter Is reopen default → ON.
5. Available Info Tabs:
- Stages: indicates what is the progress of Opportunity in terms of process, for example, “Meeting”, “Offering”, “Sold” (list is taken from Settings → Dictionary → Opportunity → Stage). Click to
 add new stage.
 - Tasks: allows creating and managing tasks of various types related to the Opportunity. Click
 to add new Task or
  and select Process to generate Tasks from a template.
 - Process: allows initiating processes and seeing the progress of initiated processes. If multiple processes are running, you can cancel active processes with Cancel all at the same time,
 .
. - Mail: allows seeing, creating and assigning related emails. Click
 to create new email. Click
  to assign email.
 - Offerings: allows creating offerings. Click
 to add new Offering and fill the information.
 - Competitors: allows collecting information about competitors in the same bids. Click
 to add new Competitor and fill information.
 - Acceptances: allows creating planned Acceptance Certificates. Click
 to add new Acceptance Certificate and fill the information.
 - Groups: allows grouping Opportunities according to determined types (list is taken from Settings → Groups).
- Revisions: allows seeing the history of actions taken with the Opportunity.
- Rights: allows setting rights for users relevant to the Opportunity.
6. Available navigation buttons:
- Start recording: is used to start recording time spent working on Opportunity.
- Add new: is used to create new Opportunity.
- To list: is used to go to the list of Opportunities.
Create new Opportunity
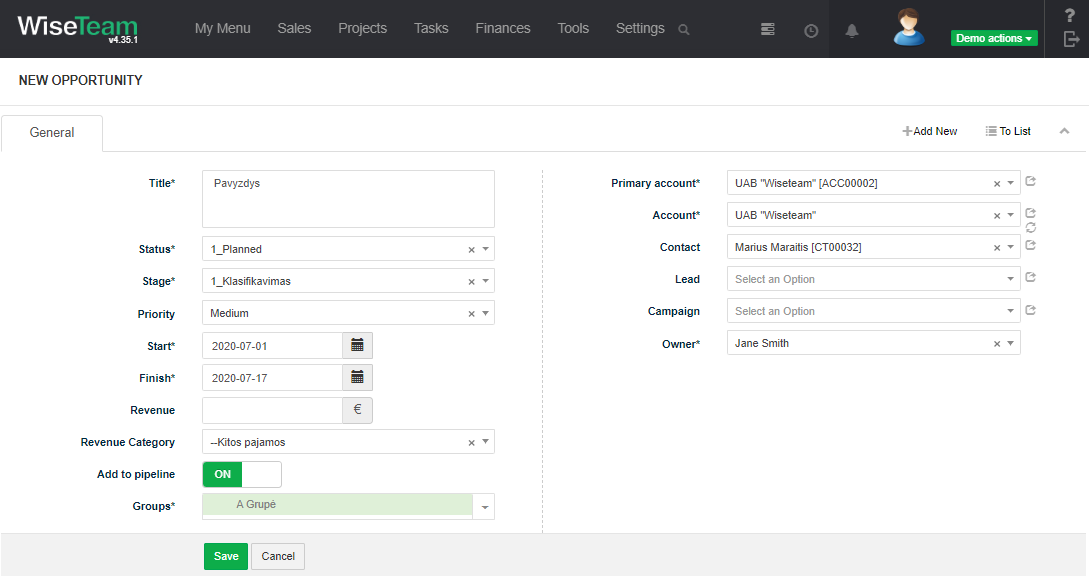
To create new Opportunity follow these steps:
1. Go to Sales → Opportunities.
2. In the list of Opportunities click ![]() .
.
3. Fill in fields in tab General:
- Title: shortly indicates what Opportunity is about.
- Status: indicates what is the progress of Opportunity in terms of time, for example, “Not started”, “In progress”, “Done”, “Cancelled” (list is taken from Settings → Dictionary → Opportunity → Status).
- Stage: stage of the Opportunity.
- Priority: priority of Opportunity.
- Start: start date of Opportunity.
- Finish: finish date of Opportunity.
- Revenue: indicates the potential revenue of the sales Opportunity.
- Costs: indicates the costs of the Opportunity.
- Revenue Category: revenue category to which this Opportunity should be assigned. This helps to group planned sales according to revenue categories.
- Add to pipeline: turn ON if you want to add Opportunity to pipeline.
- Groups: ability to assign a group to a recording being created.
- Duration, month: indicates the duration of the planned project.
- Account: Opportunity account (list is taken from Sales → Accounts). Click
 to add new Account and fill information.
 - Contact: contact person regarding this Opportunity (list is taken from Sales → Contacts related to selected Account”). Click
 to add new contact and fill information.
 - Lead: Opportunity Lead (list is taken from Sales → Leads). Click
 to add new lead and fill information.
 - Campaign: Opportunity Campaign (list is taken from Sales → Campaigns). Click
 to add new campaign and fill information.
 - Owner: who will be responsible and accountable for this Opportunity (list is taken from Settings → Users).
4. Click Save.
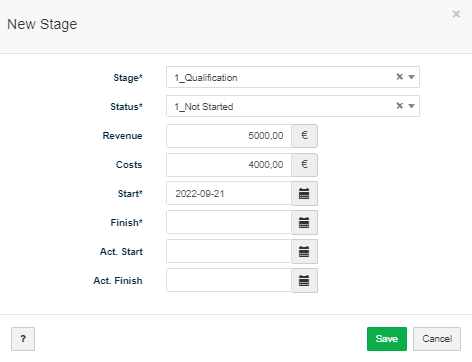
Add Opportunity stage
To add Opportunity Stage follow these steps:
1. In tab Stage click ![]() .
.
2. Fill in information of the stage:
- Stage: stage of the Opportunity.
- Status: status of the stage.
- Revenue: indicates the potential revenue of the sales Opportunity.
- Costs: indicates the costs of the Opportunity.
- Planned start: planned start date.
- Planned finish: planned finish date.
- Actual start: actual start date.
- Actual finish: actual finish date.
3. Click Save.
Fields Probability and Potential are filled in automatically:
- Probability, %: indicates probability in percentages to earn determined revenues.
- Potential: according to revenue and probability system counts automatically the potential amount receivable.
Create Task related to Opportunity
It is possible to create Tasks related to Opportunity in several locations of the system: Kanban window, Tasks list window, Opportunity form, Opportunities list window.
To create new Task related to Opportunity in the Opportunity form follow these steps:
1. In tab Tasks click ![]() .
.
2. Fill in Task’s information and click Save.
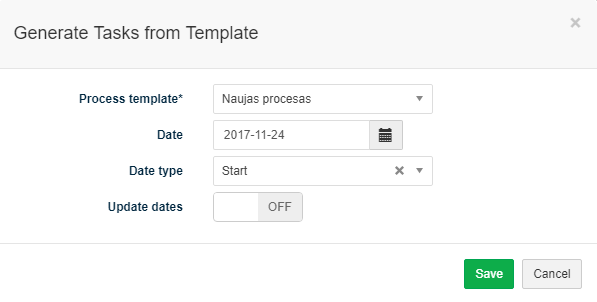
Generate a set of Tasks related to Opportunity (initiate Process)
It is possible to generate a set of Tasks related to Opportunity from a template (initiate a predefined process). To generate a set of Tasks related to Opportunity follow these steps:
- In tab Tasks click
 and select Process or in tab Process click
  .
. - Select process template from the drop-down menu (list is taken from Settings → Processes).
- Define date when process should start / finish.
- Define date type: Start – First Task of the process will start on the indicated date, Finish – dates of the process Tasks will be defined so that the process would end on the indicated date. Important: there is a possibility to define process finish date only if process does not have decision tasks.
- Active Update dates option automatically updates tasks dates when changes in process task planned dates are made.
- Click Save.
Add Competitor
To add Competitor follow these steps:
1. In tab Competitors click ![]() .
.
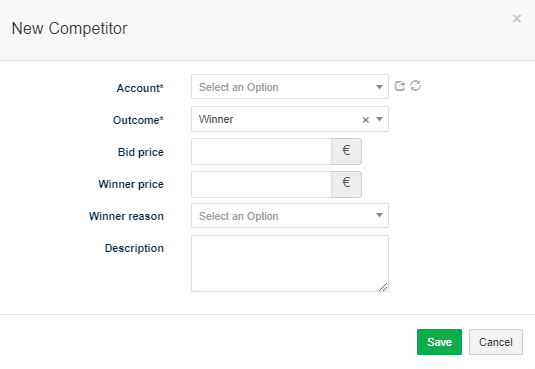
2. Fill in information of the Competitor:
- Account: conduct search of the Competitor.
- Outcome: indicates whether competitor won or was rejected.
- Bid price: competitor’s bid price.
- Winner price: price offered by the winner.
- Winner reason: indicates winner reason.
- Description: additional description.
3. Click Save.
Generate Project from Opportunity
To generate a Project from a particular Opportunity follow these steps:
1. In the Opportunity form click Create Project button.
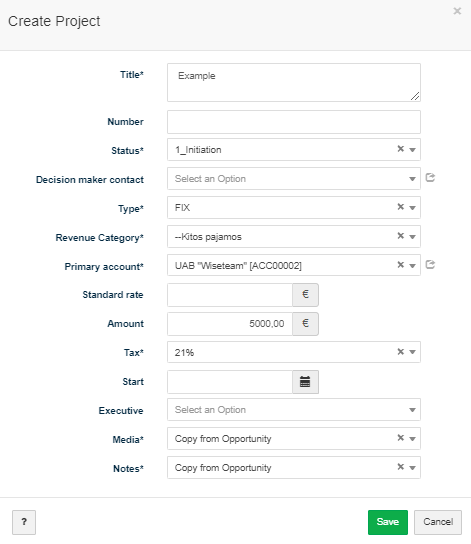
2. Fill in information about Project that will be created:
- Title: title of the Project.
- Number: Project number assigned to signed Contract.
- Status: indicates status of the Project (list is taken from Settings → Project → Status), according to the project phase.
- Decision maker contact: indicates contact who make a decision.
- Type: fixed, time and material, fixed/time and material, not billable (list is taken from Settings → Dictionary → Project→ Type).
- Revenue Category: revenue category to which particular Project should be assigned
- Standard rate: standard rate of amount billed for single hour of the Project without taxes.
- Amount: planned budget for Project (based on Info Tab: Budget) excluding taxes.
- Tax: tax used for Project by default.
- Start: Project start date.
- Executive: Project Executive represents user who will directly use the output of the Project, has ultimate responsibility for the Project and has to assure that the Project remains desirable, viable and achievable at all times. Project Executive would normally come from the senior management (list is taken from Settings → Users).
- Media: choose wether to copy, move from Lead or to leave on Lead media.
- Notes: choose wether to copy, move from Lead or to leave on Lead notes.
3. Click Save.
Perform actions in the list of Opportunities
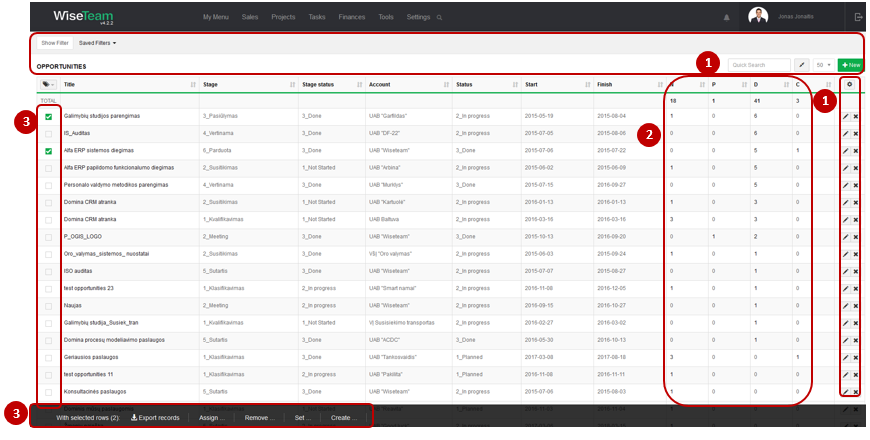
1. As in all lists, you can work with Opportunities by using standard functionality buttons: filter Opportunity, add new Opportunity, change table properties, search Opportunities, narrow or extend information viewable in table cells, edit or add additional information to the Opportunity, delete Opportunity from the list.
2. It is possible to see how many related Not Started, In Progress, Waiting, Done or Cancelled tasks Opportunity has.
3. It is possible to perform actions with Opportunites in the list without opening the entries. After selecting single or multiple Opportunities by marking lines ![]() or selecting all Opportunities by clicking button
or selecting all Opportunities by clicking button ![]() available actions are:
available actions are:
- Export records: is used to export selected Opportunities to MS Excel file.
- Assign Rights: is used to assign rights to review and edit Opportunities information for work groups, user groups or specific users.
- Remove Rights: is used to remove rights to review and edit Opportunities information from specific work groups, user groups or specific users.
- Set Status: is used to set status to selected Opportunities (list is taken from Settings → Dictionary → Opportunities → Status).
- Set Priority: is used to set priority to selected Opportunities (list is taken from Settings → Dictionary → Opportunities → Priority).
- Set Owner: is used to assign new Owner to selected Opportunities.
- Set Groups: is used to set up a group for selected Opportunities.
- Create Task: is used to create new Task related to selected Opportunities. In case several Opportunities are selected several Tasks will be created.
