In this section you can review some useful information that will let you to familiarize yourself with navigation, buttons and some basic functions that you will find in many locations of the WiseTeam system. It is useful to review this section before starting to analyze WiseTeam system’s functionality in detail but you can always come back here later as links to related information of this section is provided in other sections.
Log into Wiseteam
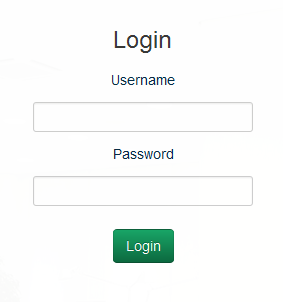
In order to log into WiseTeam system open internet browser and enter provided internet address into address bar. In appeared web page enter your Login information and click Login. Following page will be your workplace with Kanban part as the primary view of the WiseTeam system.
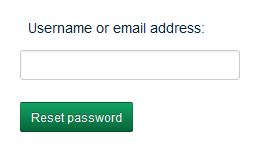
In case you you have forgotten your password, you can reset your password. To reset your password follow these steps:
1. In the login window click Login. Message of invalid credentials will appear.
2. Click Click here to reset password under the message of invalid credentials.

3. Enter your username or email address that is indicated in your user account and click Reset password.
4. A message is sent to your email address. Click on the link in the e-mail message.
5. Fill in your new password twice.
Find your way around WiseTeam
Every time you log into WiseTeam you will end up on the Kanban window. From the Kanban window, and any other location, you can always reach other WiseTeam system’s locations by using top Navigation bar.
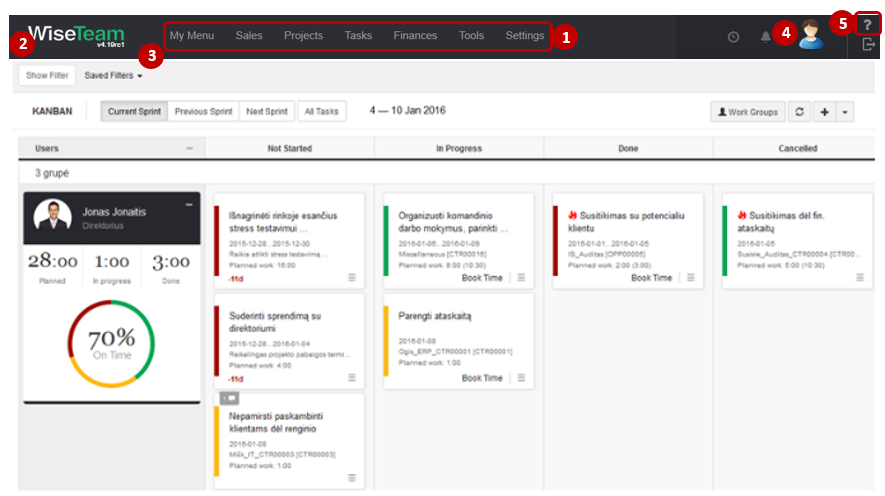
1. Available menu items:
- My Menu: menu of User’s personally chosen WiseTeam system’s locations. My menu is used to easily access desired locations of the WiseTeam system.
- Sales: depending on assigned rights, menu item include registers related to sales such as Leads, Opportunities, Sales Pipeline, Campaigns, Offerings, Accounts, Contacts.
- Projects: depending on assigned rights, menu item include tools used to create and manage contracts such as Projects, Activities, Baseline, Assets, Timesheets, Time Reports, Time Approver, Time Submitter.
- Tasks: menu item include tools used to manage everyday work such as Backlog, Tasks list, Kanban.
- Finances: depending on assigned rights, menu item include tools used to manage company’s budget and contract finances such as Budget, Acceptance Certificate, Invoices, Pro Forma Invoices, Payments, Purchases, T&M Expenses, Bonuses.
- Tools: depending on assigned rights, menu item include Dashboard used to see the overall view of contracts, tasks and additional tools such as Risks, Incidents, Problems, Issues, Change Requests registers, Knowledge Management, Mail, Mail Queue, Media, Surveys.
- Settings: depending on assigned rights, menu item include tools used to Change passwords, manage Users, Resources, Work Groups, Processes, Groups, Settings, Dictionary, Import, System info.
2. By clicking on WiseTeam logo you will always get back to Kanban window from any system’s location.
3. By clicking on the version number under WiseTeam logo you can get information what changes have been made after system’s updates.
4. Every time task is assigned to you, Time submitted, Time rejected, etc., you get a notification which details can be get by clicking on the notifications icon. It is possible to change notification settings and define which notifications to get.
5. By clicking on ![]() it is open current window in the help site.
it is open current window in the help site.
6. Clicking on the icon ![]() allows you to see the background job process in progress.
allows you to see the background job process in progress.
Customize My Menu
My menu is menu of User’s personally chosen WiseTeam system’s parts. By default without customization first parts are Kanban and Timesheets. But this can be customized according to desires of each user.

In Customize it is possible to edit My Menu items for fast access to the desired location of WiseTeam system. Select preferable WiseTeam items by clicking on their titles. Displayed items will change color of tick from grey to green and appear in My Menu part.

Understand functionality buttons
Functionality buttons encountered multiple times over WiseTeam:
- New entry (
 ): is used to create a system-wide new entries, except in parts that have logical restrictions (Baseline; Timesheet; Time Approver; Time Submitter; Mail; Mail Queue; Change Password; Settings).
 - Table properties (
 ): is used to personally customize visible table columns according to the needs of a User. Used to show or hide columns or change order of columns in tables.
 - Organize view (
 ): is used to narrow or extend information viewable in table cells.
 - Search fields: WiseTeam provides two types of search fields. Global search (
 ) can be founded in top menu line of WiseTeam that is seen when visiting any part of WiseTeam. Global search provides information from all parts of the system if the searched key word is mentioned. Quick search (
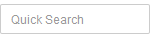 ) performs search only in a viewable part of system. Local search is used with all tables and Timesheet table right menu. When you enter search text in the Quick Search field, the field is highlighted in green
  . Pressing “x” will clear the search text entered.
 - Displayed number of lines (
 ): is used to select maximum number of viewable table lines in one screen. To see further information use other pages accessible from (
 ) page numbers or “Previous” and “Next” buttons found in bottom of table.
 - Select table lines (
 ): there is possibility to select single or multiple lines in various tables to perform actions without opening the entries. Marking entry line in table with a tick provides user with possible options that appears in bottom of the screen in black background. Possible options depend on the user’s existing rights. Select/Unselect All (
  ) button gives possibility to select all of entries related to category, not only visible by selected number of lines. For example if there are 300 accounts in database but user at the moment sees only 100, Select All ability marks all 300 accounts instead of visible 100; same method applies for all other entry lines. When filter is applied Select/Unselect All button selects all filtered records.
 - Edit record (
 ): is used to open form of the record for editing or adding additional information.
 - Delete record (
 ): is used to delete record from list.
 - Sort records (
 ): is used to sort records ascending and descending.
 - Show filter (
 ): there is a possibility to define and apply filter. To open filter configuration option and define conditions click . There is a possibility to apply defined filter once or to save filter in order to easily access it when it is needed. Saved filters can be accessed by clicking
  .
.
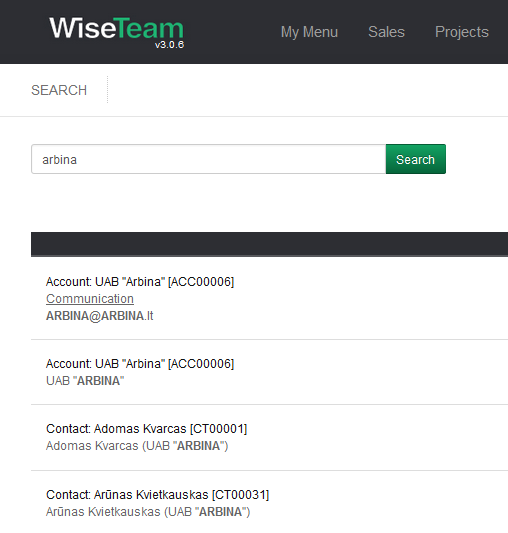
Perform global search
Global search (![]() ) provides possibility to search for following entities:
) provides possibility to search for following entities:
- Accounts by Account name and Company code
- Communications (email, phone, mobile, etc., except address) by communication title
- Contacts by Contact name, position, Account name (search results provides Contacts whose main company is referred in the search field)
- Projects by Project title and project id
- Activities by Activity title and WBS number
- Opportunities by Opportunity title, Account name, Contact name and Opportunity code
- Tasks by Task title
- Knowledge management by Knowledge base title
- Leads by Lead title, Account name
- Notes by text provided in the note.
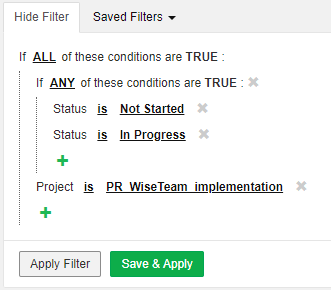
Filter records
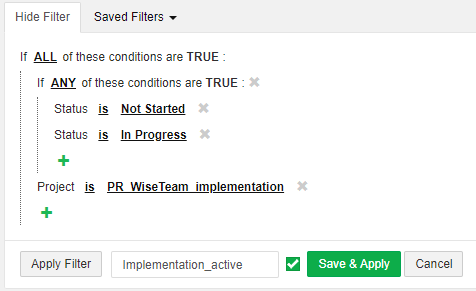
In every list there is a possibility to define and apply filters. To define new filter follow these steps:
1. To open filter configuration option click ![]() .
.
2. Define whether ALL of the defined conditions have to be TRUE or ANY of the defined conditions have to be TRUE to show records when filter is applied. If you want to combine several conditions combinations click ![]() and select Conditions Combination.
and select Conditions Combination.
3. Define filter conditions by selecting fields and their values by which you want to filter the list.
4. If you want to filter records by date you can define exact date in the condition (![]() ) or define a condition that allows filtering records by relative date and can be reused every time you need. To define today’s date, plus or minutes the desired time from today filter use this combination:
) or define a condition that allows filtering records by relative date and can be reused every time you need. To define today’s date, plus or minutes the desired time from today filter use this combination:
- Begin with bracket { (needed for the system to understand that there will be a relative date).
- Integer number (if positive, it appears without a plus).
- Modifier d – day; w – Week; m – month; y – year.
- Finish with bracket } (required).
For example, {0d} – today, {1w) – one week ahead from today, {-1d} – one day ago from today.
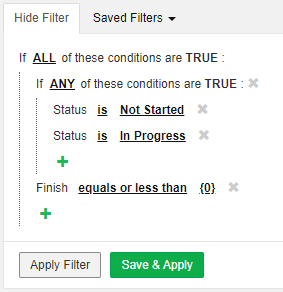
5. When all conditions are defined choose whether you want to apply defined filter once (click Apply filter) or to save filter in order to easily access every time you need it (click Save & Apply, fill in a title of the filter and again click Save & Apply).
6. There is a possibility to share the defined filter with other users by marking a tick between filter title and Save & Apply button).
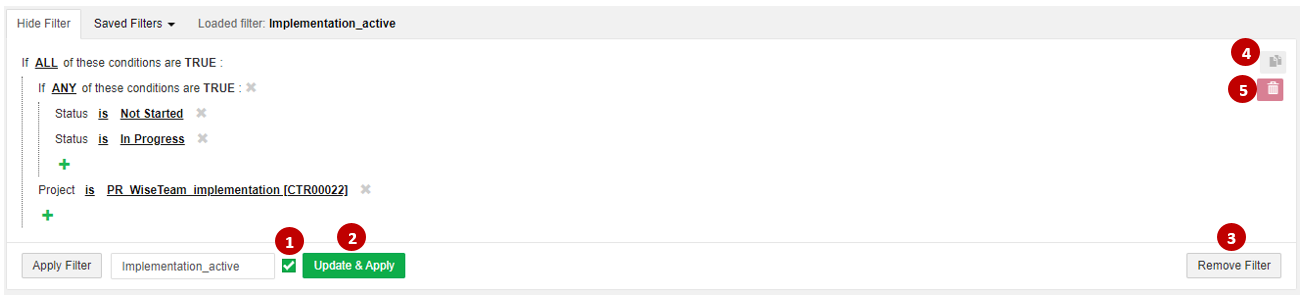
Saved filters can be accessed by clicking ![]() .
.
When filter is applied available actions are:
1. Choose to share filter with other users.
2. Update & Apply: is used to save updated filter after filter conditions have been edited.
3. Remove filter: is used to remove applied filter.
4. Copy filter: allows copy applied filter in order to reuse its conditions when defining new filter.
5. Delete: is used to delete filter from the list of saved filters.
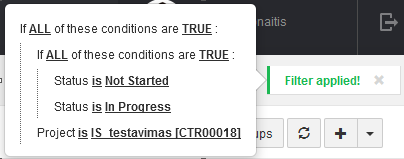
If filter conditions are hidden, it is possible to review what conditions are applied by placing the mouse on Quick View or to remove applied filter by clicking ![]() in the right corner of the window.
in the right corner of the window.
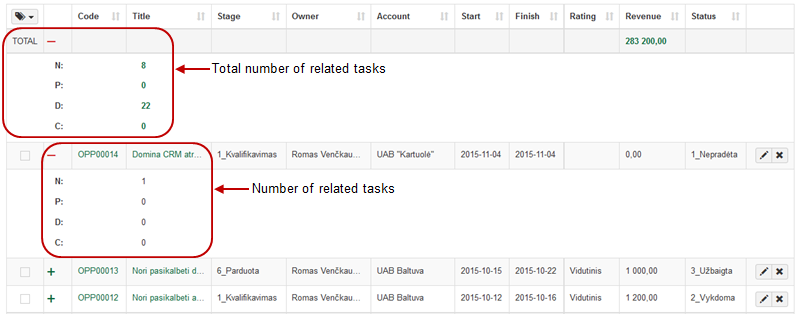
Monitor related Tasks in the list
In every list, except in parts that have logical restrictions (Tasks list, Baseline, Time reports, Time approver, Time submitter, Backlog, Budget, Knowledge management), there is a possibility to see how many related Not Started, In Progress, Done or Cancelled Tasks record has. This allows you to easily monitor with what records you are currently working.
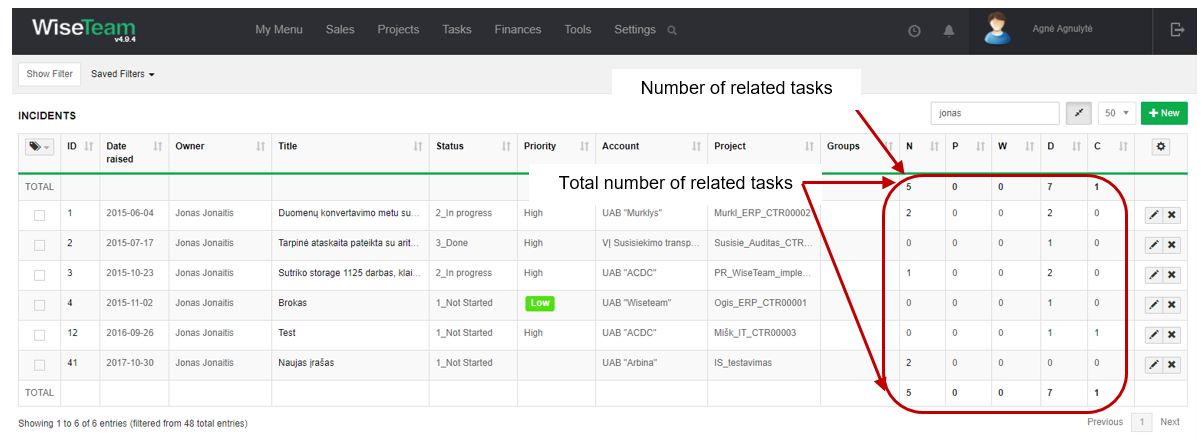
To review related Tasks click on the number of Tasks. A list of Not Started, In Progress, Done or Cancelled Tasks related to particular record will be opened. In this list you can see which Tasks are on time and which are late.
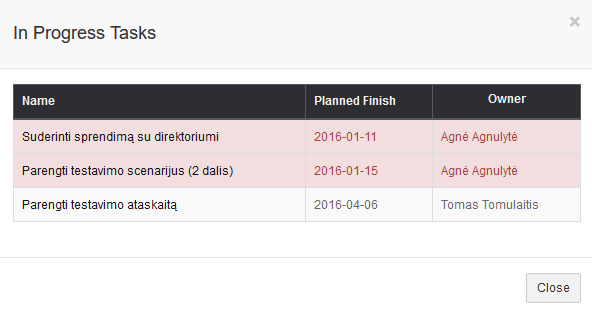
In case you are working with smaller screen you can see how many related Tasks record has by clicking![]() .
.
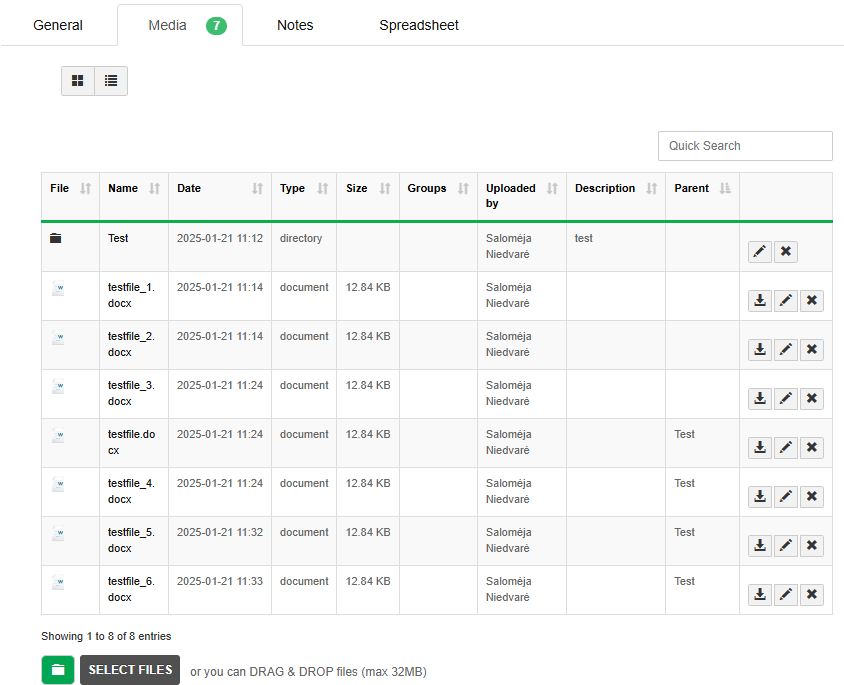
Atach file
In most forms under tab Media there is a possibility to attach files and create/rename folder (one level hierarchy).
To attach file follow these steps:
1. Go to tab Media.
2. Click Select files and add files or Drag & Drop.
You can choose to view attached files in icons view by clicking ![]() .
.
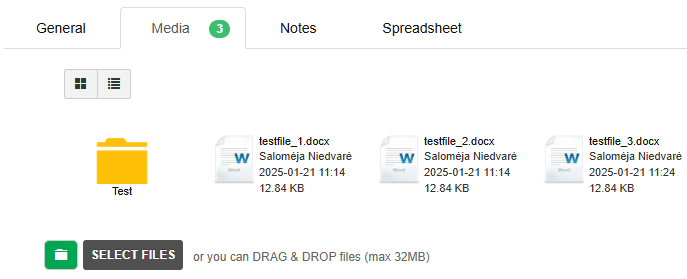
You can choose to view attached files in list view by clicking ![]() .
.
Add note
In most forms under tab Notes there is a possibility to add note. To add new note follow these steps:
1. Go to tab Notes.
2. Click Add note, fill in information and click Save.
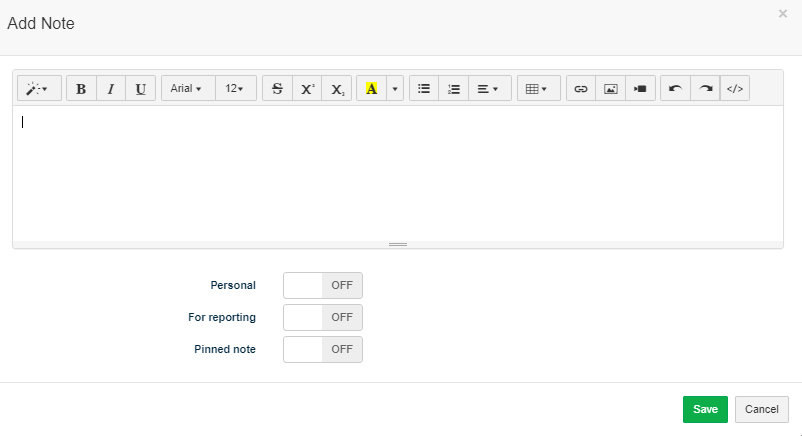
In case button Personal is turned on, particular note will be seen only for User who has created this note.
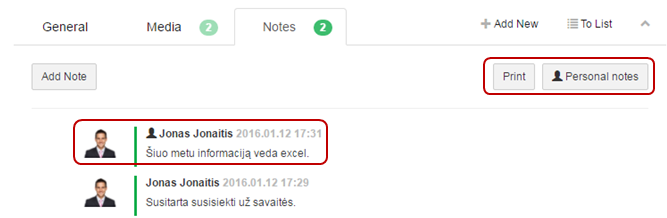
Available actions:
- Print is used to create a PDF file containing all the notes.
- Personal notes is used to filter personal notes from the notes list.
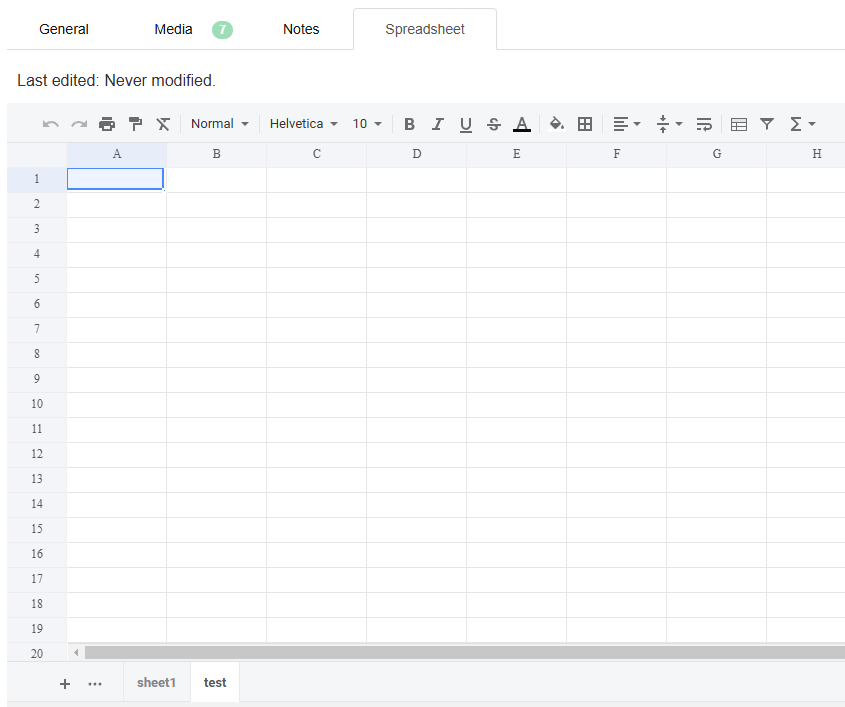
Spreadsheet
In all forms is Spreadsheet tab. It’s similar to excel, just have less function. It is possible to have multiple spreadsheet sheets, rename and delete them.
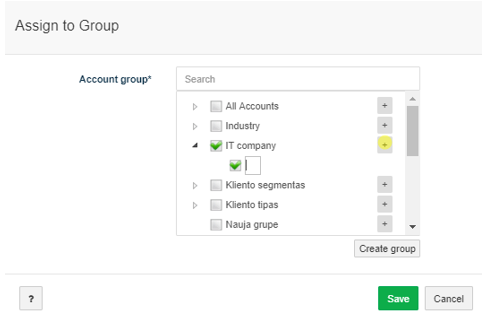
Assign record to a group
All records such as Leads, Opportunities, Accounts, Contacts, Risks, Incidents, etc., except cases that have logical restrictions, can be assigned to a group. Groups let you easily filter records by defined characteristics.
To assign record to a group follow steps:
1. In the record form (Lead, Opportunity, Account, Contact, etc.) go to tab Groups.
2. Click ![]() , choose group and click Save.
, choose group and click Save.

There is a possibility to create new Group when assigning record to a group:
1. Click Create Group.
2. Fill name of the group.
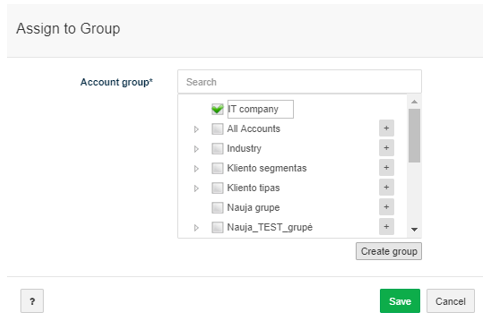
3. Group saved automatically when click anywhere.
4. Click ![]() to create subgroup of parent group.
to create subgroup of parent group.
Monitor changes made to records
Every time user makes a change to a record history of user’s actions is saved. In most forms under tab Revisions there is a possibility to review the history of the changes: date, user and changes that were made.
