Navigation: Settings → Settings
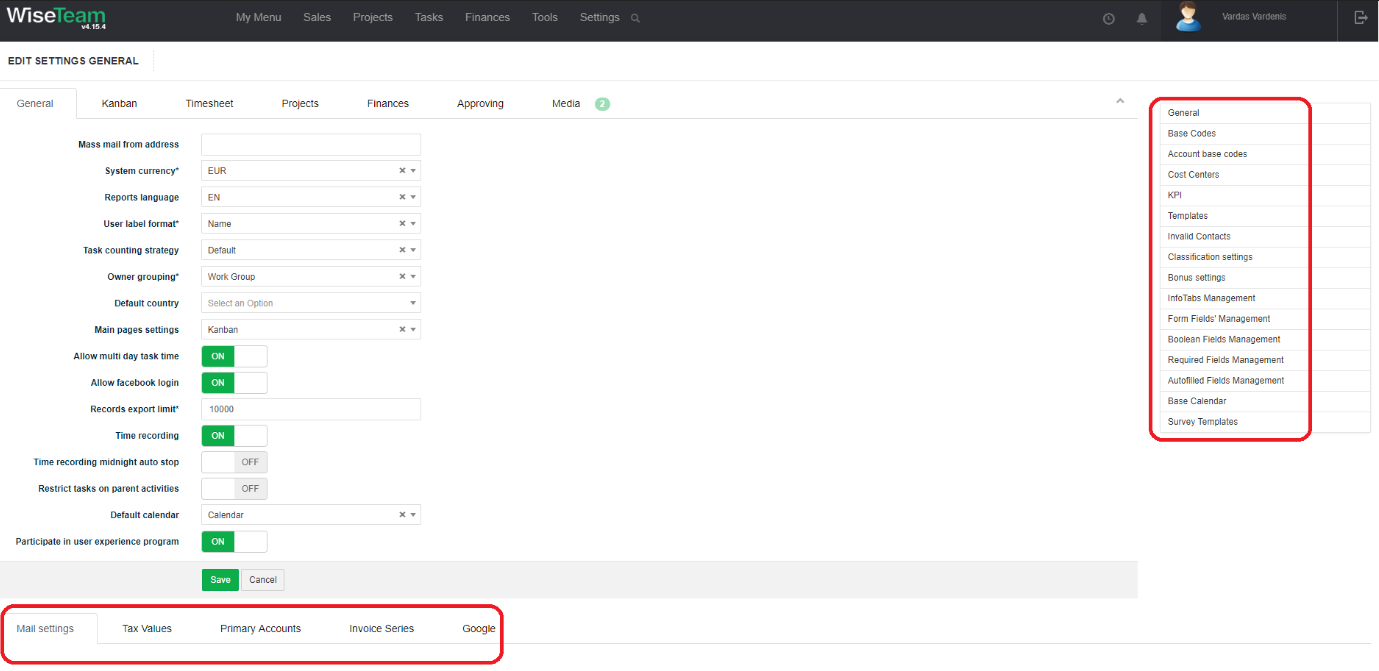
Option is used to manage the following WiseTeam settings.
1. General: allows defining general WiseTeam settings.
2. Base codes: allows reviewing and editing rules used to format unique base codes of the records.
3. Account base codes: allows reviewing and editing account base codes (field Code) that are used in Activity code.
4. Cost centers: allows defining cost centers that are used to calculate KPIs.
5. KPI: allows defining targeted values of KPIs.
6. Templates: allows creating and editing existing templates.
7. Invalid Contacts: allows reviewing and editing invalid Contacts.
8. Classification settings: allows defining Accounts’ classfication rules.
9. Bonus settings: allows defining whether or not bonus sum has to be validated with Acceptance certificate sum.
10. InfoTabs Management: allows defining which InfoTabs will be shown in forms.
11. Form Field’s Management: allows defining which fields will be shown in the forms. Define which fields will be shown by clicking on visibility symbol (when visibility symbol ir green![]() , field will be shown in the form, when visibility symbol is black
, field will be shown in the form, when visibility symbol is black ![]() , field will not be shown in the form).
, field will not be shown in the form).
12. Boolean Fields Management: allows defining default boolean fields values. Define which fields by default have to be On and which Off.
13. Required Fields Management: allows defining which fields are required by turning button ON or Off.
14. Autofilled Fields Management: allows defining which fields have to be autofilled by turning button ON or Off.
15. Base Calendar: allows defining nonworking days.
16. Survey Templates: allows to create survey templates.
17. Mail settings: allows setting email to send automatic system notifications and to send emails during campaign to campaign audience.
18. Backlog Email: allows setting email to receive backlog tasks
19. Tax Values: allows defining tax values.
20. Primary Accounts: allows defining primary accounts that contacts (users) will be using WiseTeam.
21. Invoice Series: allows defining rules for Invoice series.
22. Google: allows defining integration with Google Calendar.
There is a possibility to change the following WiseTeam settings:
1. General settings:
- Mass mail from address: email address from which mail is sent during marketing campaigns.
- System currency: select currency that will be used in the WiseTeam.
- Reports language: select reports language that will be used for all reports in the WiseTeam.
- User label format: choose the format from combination of user name and/or code that will be used in the owner fields.
- Task counting strategy: choose how Tasks displayed in Accounts list in NPDC columns should be calculated. Choose Default if all Tasks should be calculated or choose Sales separated if only Tasks related to Leads, Opportunities and Campaigns should be calculated.
- Owner grouping: choose how users have to be grouped in Owner field (there is a possibility to choose not to group users, to group users by their rights group or by workgroups that users are assigned).
- Default country: select default country that will be selected by default when entering addresses.
- Main page settings: select main page (Activity Calendar, All Timesheets, Dashboard, Opportunity Kanban, Kanban, Timesheet) that will be opened after login and clicking on the logo in the right corner of the window.
- Allow multi day task time: choose whether to allow defining Task’s start and finish time for the multi day Tasks.
- Allow facebook login: choose whether to allow to login using facebook account.
- Records export limit: number of records that can be exported.
- Task cancel reason mandatory: activate the enter reason fields for cancellation of tasks: Reason and Reason Description. Reason — the field value is filled in with the value selected from the list. Reason Description — the value is entered manually.
- Time recording: choose whether to turn on Start/Stop button and allow time recording using this button.
- Time recording midnight auto stop: choose whether time recording should be stopped automatically at midnight.
- Restrict tasks on parent activities: choose whether it should be allowed or restricted to assign Tasks to parent Activities.
- Password expiration interval: option to choose which interval will be password expiration: Never expires, 1 month, 3 month, 6 month, 12 month.
- Password level: is used to determine password level.Selecting a Low, valid condition: MUST contain at least 8 charactersSelecting a Medium, valid conditions: MUST contain at least 8 characters, MUST contain at least one uppercase letter, MUST contain at least one lowercase letter, MUST contain at least one numberSelecting a High, valid conditions: MUST contain at least 8 characters, MUST contain at least one uppercase letter, MUST contain at least one lowercase letter, MUST contain at least one number, MUST contain at least one special character (!”#$%&'()*+,-./:;<=>?@[\]^_`{|}~ )
- Default calendar: choose whether work will be scheduled both on working and nonworking days by selecting None or work will be scheduled only on working days by selecting Calendar. There is a possibility to define nonworking days in Base calendar.
- Participate in user experience program: choose whether to allow participate in user experience program.
- Limit task dates by activity dates: if parameter is ON it is verified that the task’s planned start/end date is within the activity’s planned start/end date range.
2. Kanban settings:
- Kanban sprint duration: duration of Kanban sprint.
- Kanban first sprint date: date of first Kanban sprint.
- Kanban all tasks limit: unlimited, tasks of 1, 3, 6, 12, 24 months period.
- Kanban restrict task editing: if button is on then only task owner or author can edit task in Kanban.
- Task copy prefix: prefix that will be added to coppied task’s title.
3. Timesheet settings:
- Business hours start: define when business hours start.
- Business hours end: define when business hours end.
- Activity hours start: default time when Activity hours start when Activity is being created in All Timesheets window.
- Activity hours end: default time when Activity hours end when Activity is being created in All Timesheets window.
- Task project title: if enabled Project’s title will be displayed next to Task’s title in Tasks’ list displayed in My Timesheet window.
- Display completed activities: if enabled completed Activities will be displayed in My Timesheet window.
- Restrict time records on project: if enabled it will be restricted to create Time records related directly to Project.
- Default event color template: choose how users will see time records in their Timesheets (there is a possibility to choose to view time records according to Event Status, Task Type, Activity Status, Revenue Category).
- Check resource usage: used to check resource usage in area: All, Only tasks, Only Activities, None.
- Calculate maximum usage: choose which area will be calculate of maximum usage: All, Only tasks, Only Activities.
4. Projects settings:
- Task work for project budget: task work (planned or contracted) used when project budget is generated from tasks.
- Default price type: used to select option which used to price type.
- Use baseline rates: turn button ON, if used baselines rates. Turn button OFF, if used resources rates from sales price field of budget. It is need to set price type to Budget in the project form.
- Automatic client code generation: turn button ON, if client code has to be generated automatically.
- Role for activity account owner: resource’s role which can be assigned as Account owner.
- Role for activity owner: resource’s role which can be assigned as Activity owner.
- Role for activity executive: resource’s role which can be assigned as Activity executive.
- Role for activity resources: resource’s role which can be assigned as Activity resource.
- Work, h: specify work hours that will be assigned by default when creating a new Activity.
- Structural activity title: if button is turned ON, to the lower level Activity title higher level Activity title will be added.
- Allow activity reorder in gantt: choose whether to allow or not Activity reordering in Gantt chart.
- Must validate project title: turn button ON, if project title has to be validate.
- Must validate project number: turn button ON, if project number has to be validate.
5. Finances settings:
- Duration rounding type: define how to round duration in time reports. Choose None, if you want that exact duration would be added to the report, choose Common, if you want that common rounding rules would be applied, choose Ceil, if you want that duration would be always rounded to the upper number, choose Floor, if you want that duration will be always rouded to the lower number.
- Invoice send from: select one of two options: User email or Mass mail address. User email — the address of the sender of the message is the address of the user who sends the message from system. Mass mail address — the sender address of the message that is entered in the Mass mail from address field (Settings → Settings → General).
- Invoice number reservation: button defines when Invoice number will be assigned to new Invoice. Turn button ON, if you want that Invoice number would be assigned when the form of new Invoice is opened. Turn button OFF, if you want that Invoice number would be assigned after saving new Invoice.
- Invoice date validation: when button is turned ON, dates of Pro Forma Invoices, Invoices and Credit Notes are validated, this means, system doesn’t allow to save new Invoice or Credit Note with earlier date than the latest date of the Invoice or Credit Note with specific serie. When button is turned OFF, system doesn’t validate the dates of Pro Forma Invoices, Invoices or Credit Notes.
- Group T&M Expenses in Invoice: when button is turned ON, T&M Expenses are grouped in Invoices.
- Restrict transfered finances lines editing: when button is turned ON, lines of trasferred and signed Acceptance certificates cannot be edited.
- Invoice written by user: button defines who will be indicated in field Written by in the Invoice form. If button is turned ON, user who created Invoice will be indicated. If button is turned OFF, Account’s primary Contact will be indicated.
- Date acceptance certificate description: turn button ON, if you want that date would be added to the line’s description field when Acceptance certificate is created from Activity or Project form or list.
- Use pricing for not assigned resources: when button is turned ON prices defined in tab Pricing will be used for resources that was not assigned to budget, but billed time.
- Single role per resource: parameter used when resource can have only one active role.
- Default revenue category: define default revenue category.
- Time report lines for invoice: select which lines from Time report have to be added to invoice (all, with status Not Invoiced, transferred or Invoiced).
- T&M Expenses in Time Report: define how Expenses are included in time reports (Period – Expenses will be included according to the start and finish dates of the time report, All – all Expenses will be included, not depending on the set dates, Until finish – just Expenses with the date until and on time report finish date will be included in the Time report).
- Print button: when button is turned ON, standard print buttons are shown in form. If your company is using custom made templates this button allows to disable standard print button which generates document using standard template.
- Multiple acceptance lines same activity: when button is turned ON, same Activity can be added to multiple Acceptance certificates.
- Default payment period: default invoice payment period. If this setting is filled, the corresponding field is filled automatically in project form when creating new project.
- TimeReport export type: sets template generation type.
- TimeReport export PDF template: setting template generated for invoice sending.
- TimeReport export Excel template: sets the template for Excel formatting.
- Allow invoice lines reordering: when button is turned ON, invoice lines can be reordering.
- Delete time report lines: setup to delete time report lines.
5. Approving settings:
- Project for Lead time approval: Project to which all time records related to Leads will be assigned. Project owner will be able to approve or reject submitted Leads time.
- Project for Campaign time approval: Project to which all time records related to Campaigns will be assigned. Project owner will be able to approve or reject submitted Campaigns time.
- Project for Finance time approval: Project to which all time records related to Finance records will be assigned. Project owner will be able to approve or reject submitted Finance time.
- Project for Google Calendar: Project to which all time records generated from Google calendar and Wiseteam integration will be assigned. Project owner will be able to approve or reject submitted records transferred from Google calendar.
- Not submitted event approving: defines whether it is allowed to approve not submitted Time records.
- Work groups with manager time approval: Time records can be approved by Work Group Manager. Define Work Groups which Managers will approve submitted time of users assigned to that Work Group (Work Group has to be user’s primary Work Group).
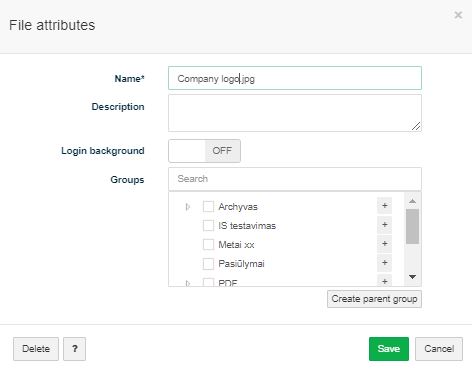
6. Media:
Allows attaching file and selecting it as a login background image. To change background image follow these steps:
1. In tab Media attach a file by dragging and dropping or by selecting file from the catalog.
2. Click on the file title.
3. In field Login background turn On.
4. Click Save.
[/collapse]
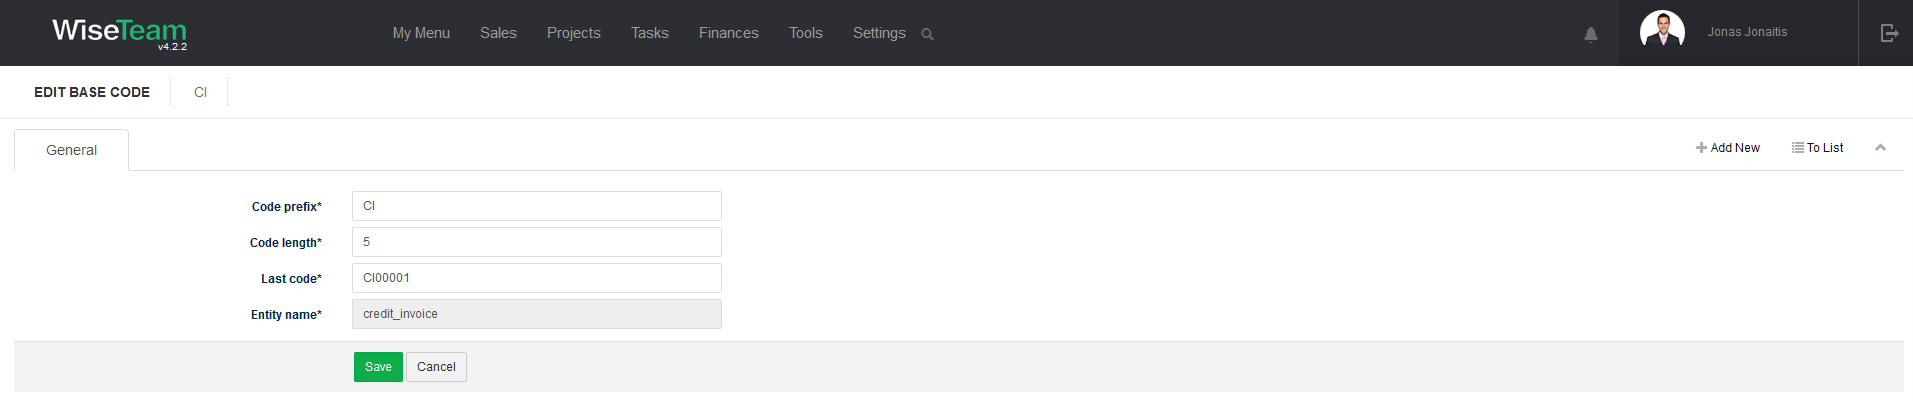
Manage base codes settings
This option allows to review and edit the rules used to format unique codes of the records. To edit the rule used to format base codes follow these steps:
1. Go to Settings → Settings →Base codes.
2. Click ![]() button to open the rule used to format the base codes of the selected entity.
button to open the rule used to format the base codes of the selected entity.
3. Edit the code prefix or code length.
4. Click Saves.
Manage cost centers
This option allows defining cost centers that do not produce direct profit and add to the cost of running a company. Defined cost centers are used to calculate KPIs.
To add new cost center follow these steps:
1. Go to Settings → Settings →Cost centers.
2. Click button ![]() .
.
3. Fill in information:
- Category: category of the costs (Administration, Non Work, Competence, Sales and Marketing, Research and Development).
- Project: Project that will be used to capture tasks and time related to selected costs category.
4. Click Save.

Define targeted values of KPIs
This option allows defining targeted values of KPIs. Defined KPIs allows to evaluate actual performance comparing it to the target.
To define KPI value follow these steps:
1. Go to Settings → Settings →KPI
2. In the list of KPIs click ![]() button.
button.
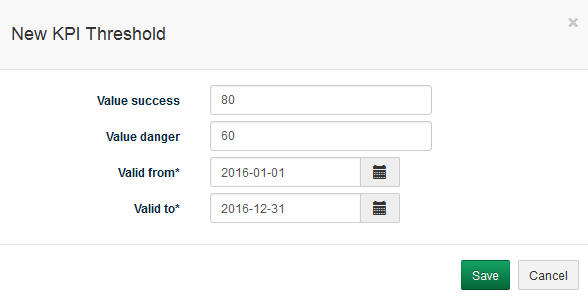
3. In tab Threshold click button ![]() and fill in information:
and fill in information:
- Value success: target value of the KPI.
- Value danger: lower value of the KPI that indicates that KPI was not reached.
- Valid from: KPI valid from date.
- Valid to: KPI valid to date.
Use ![]() button to edit defined values.
button to edit defined values.
Create new or edit existing template
This option allows creating new or editing existing templates used when printing documents. When you start using Wiseteam, you get default templates. There is a possibility to activate or deactivate these templates. It is not possible to edit existing default templates. However, you can copy default templates and when make changes.
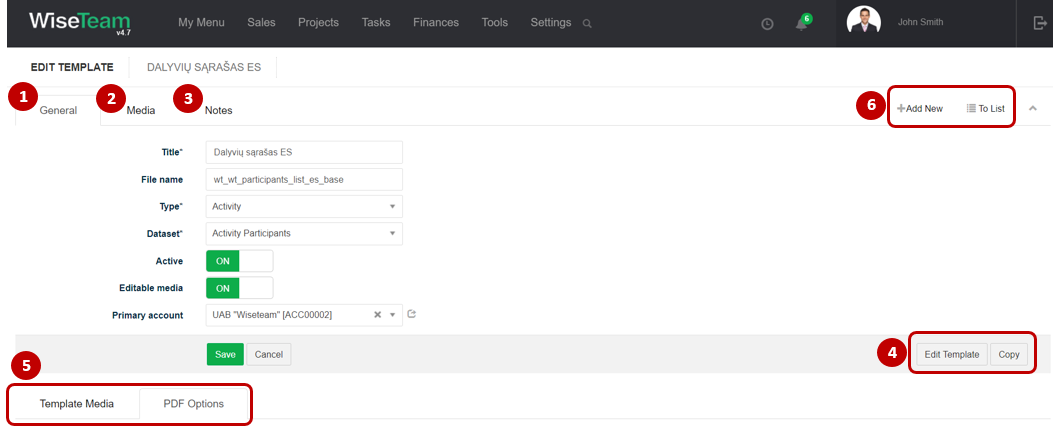
1. General template’s information is provided in tab General. You have to fill in this information when creating new template.
2. In tab Media it is possible to attach files. Click Select Files or do Drag & Drop.
3. In tab Notes it is possible to leave notes. Click Add note to create new note.
4. Actions that can be taken with template:
- Edit template: allows editing template. This option is not available for default templates. If you want to change a default template, you have to make a copy of it by clicking button Copy.
- Copy: allows copying template.
5. Available Info Tabs:
- Template media: provides a possibility to change media used in a template. If you want to change one or several media files used in the template, click
 , select which template media to change, select media file and click Save. If you want to change all default media files used in the template, click
  , select Add defaults and select files for each template media.
 - PDF options: allows defining PDF orientation, right, left, top and bottom margins.
6. Available navigation buttons:
- Add new: is used to create new template.
- To list: is used to go to the list of templates.
To create new template follow these steps:
1. Go to Settings → Settings →Templates and click ![]() button.
button.
2. Fill in template’s information:
- Title: template’s title.
- Name: template’s title (must to be unique).
- File name: file’s generated from template title.
- Subject: subject of template.
- Type: object for which template is created.
- Dataset: dataset used in a template.
- Active: turn button ON to activate template.
- Show in form: turn button ON to show template in list of form.
- Editable media: turn button ON is templates media can be edited.
- Primary account: select primary account for which this template is created. When printing document from a template, templates will filtered according to primary account.
- Source: templates code written in Twig.
3. Click Save.
Manage Accounts classification settings
This option allows defining Accounts classification rules. There is a possibility to classify Account by these attributes:
1. Classification by whether or not Account is new. To add this classification rule in field New account group indicate Account group that have to be assigned when new Account is created.
2. Classification by whether or not Account is a potencial customer. To add this classification rule in field Potential account group indicate Account group that have to be assigned when Account has related Leads or Opportunities.
3. Classification by whether or not Account has Invoices. To add this classification rule in field Account with invoices group indicate Account group that have to be assigned when Account has Invoices. In field Active Account period, d indicate period in days after that group has to be removed if no Invoices were issued.
4. Classification by number of employees. To add this calssification rule in tab Account Employees Classification click ![]() , define employees number and group that has to be assigned.
, define employees number and group that has to be assigned.
5. Classification by Invoices amount during given period. To add this classification rule in tab Account Invoices Classfication click ![]() , define Invoices amount and group that has to be assigned. Additionaly in field Account Invoices’ classification period, d indicate period in days after that group has to be removed if defined amount is smaller.
, define Invoices amount and group that has to be assigned. Additionaly in field Account Invoices’ classification period, d indicate period in days after that group has to be removed if defined amount is smaller.
Account groups are defined in Settings → Groups → Accounts.
To classify existing Accounts created before classification rules were defined click button Classify and select which classification rule to apply.
Manage InfoTabs
To define which InfoTabs will be shown in forms follow these steps:
1. Go to Settings → Settings → InfoTabs Management.
2. Find object that you need and define which InfoTabs will be shown by clicking on visibility symbol (when visibility symbol ir green![]() , InfoTab will be shown in the form, when visibility symbol is black
, InfoTab will be shown in the form, when visibility symbol is black ![]() , InfoTab will not be shown in the form).
, InfoTab will not be shown in the form).
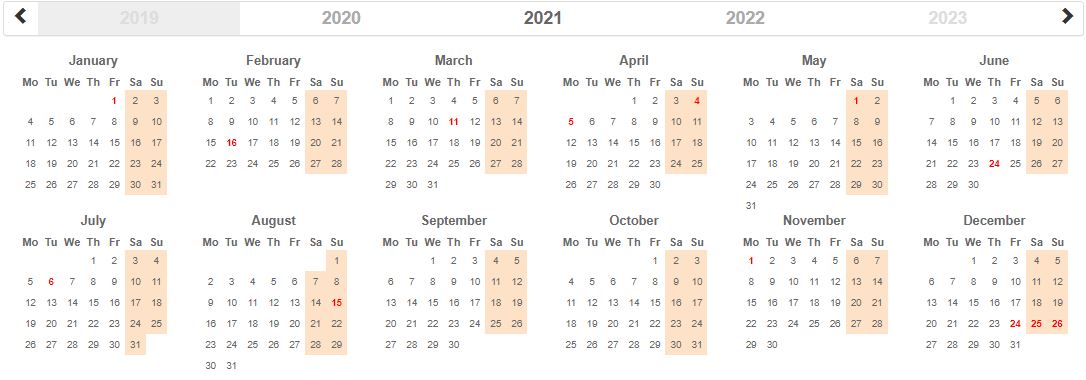
Define nonworking days in Base calendar
Wiseteam has a base calendar with a typical Monday through Friday work week. There is a possibility to define additional nonworking days so that project dates would be scheduled appropriately.
To change base calendar follow these steps:
1. Go to Settings → Settings → Base calendar.
2. Click on the desired day to make it a nonworking day. By default weekends are nonworking days. Other nonworking days are red.
Create new or edit existing Survey template
This option allows creating new or editing existing Survey templates used for project or activity surveys.
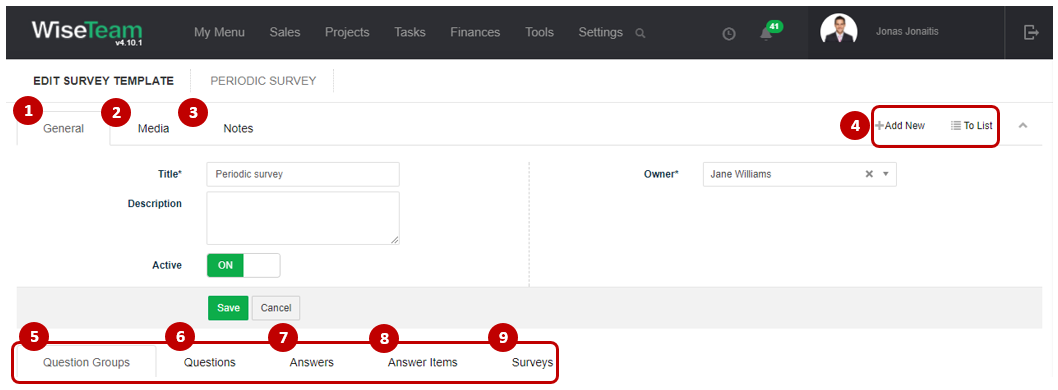
1. General Survey template information is provided in tab General. You have to fill in this information when creating new template.
2. In tab Media it is possible to attach files. Click Select Files or do Drag & Drop.
3. In tab Notes it is possible to leave notes. Click Add note to create new note.
4. To create new Survey template follow these steps:
- Go to Settings → Settings → Survey Templates and click
 button.
 - Fill in template’s information:
- Title: survey templates’ title, used when selecting a survey template in project or activity.
- Description: survey templates’ description.
- Active: turn button ON to activate template.
- Owner: user responsible for this Survey template (list is taken from Settings → Users).
- Click Save.
5. It is possible to create Question Groups in Survey Templates in order to group questions. To create new Question Group click ![]() and fill in information:
and fill in information:
- Title: Question Group title, used in a survey results in project or activity.
- Description: Question Group description.
- Survey Template: indicate Survey template related to Question Group.
6. It is possible to create Question in Survey Templates. To create new Question click ![]() and fill in information:
and fill in information:
- Title: Question title, used in a survey results in project or activity.
- Description: Question description.
- Type: Question type can be chosen from Text and List types. Questions with a Text type allows to create a question with an answer field for textual information and questions with a List type allows to create a question with a fixed list of answers.
- Answer: Answer must be selected for questions with a List type. To create new Answer go to Answers part, click and fill in information.
- Group: Question can be assigned to a certain Question group.To create new Question groups go to Question Groups part, click and fill in information.
- Group sequence number: It is possible to define question sequence in a group, if a question is assigned to a Question group.
7. It is possible to create Answer in Survey Templates. To create new Answer click ![]() and fill in information:
and fill in information:
- Title: Answer title, which used creating a question.
- Description: Answer description.
- Survey Template: indicate Survey template related to Answer.
8. It is possible to create Answer Item in Survey Templates. To create new Answer Item click ![]() and fill in information:
and fill in information:
- Title: Answer title, which used creating a question.
- Description: Answer description.
- Answer: indicate Answer related to Answer Item.
9. It is possible to create Survey from Survey Template or review related Surveys. To create new Survey click ![]() and fill in information:
and fill in information:
- Title: title of the Survey.
- Description:description of the Survey.
- Status: indicates status of the Survey (list is taken from Settings → Dictionary → Project → Status).
- Survey template: Select survey template from the drop-down menu (list is taken from Settings → Settings → Survey Templates).
- Project: indicate Project related to the Survey.
- Activity: indicate Activity related to the Survey.
- Owner: indicate who is responsible for this Survey (list is taken from Settings → Users).
- Start: indicate planned start of the Survey.
- Finish: indicate planned finish of the Survey.
- Actual start: indicate actual start of the Survey.
- Actual finish: indicate planned finish of the Survey.
- Respondents count: indicate the number of respondents for the Survey.
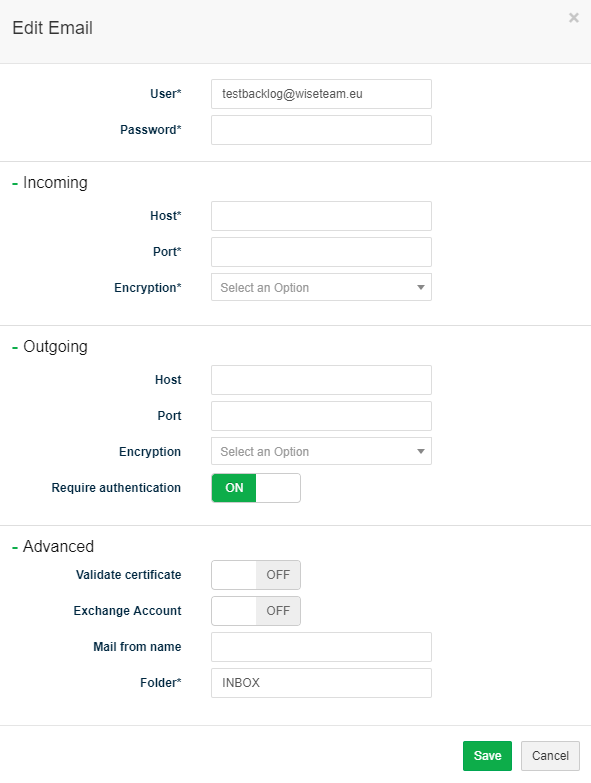
Define email used to send notifications and mailing
To define email used to send automatic system notifications and emails during campaign to campaign audience follow these steps:
1. In tab Mail settings click ![]() button.
button.
2. Fill in email information.
3. Click Save.
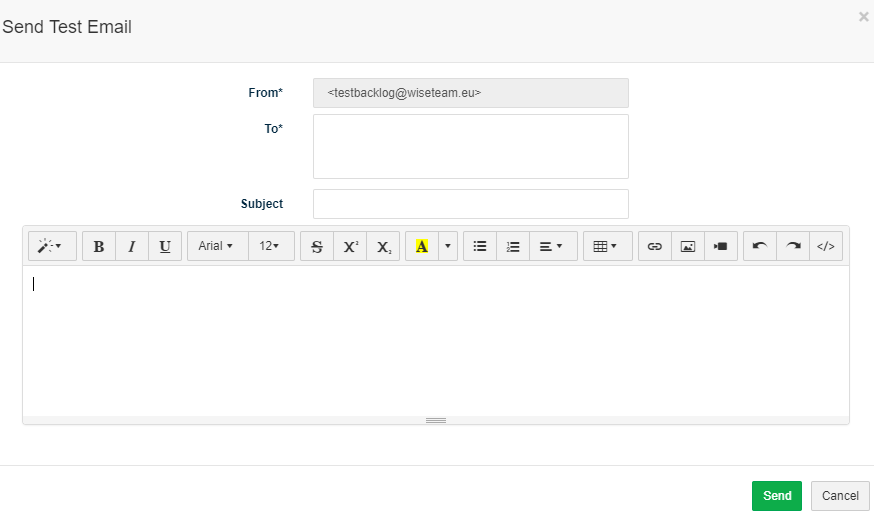
In order to check whether email was set properly send test email:
1. In tab Mail settings click ![]() button.
button.
2. Fill in email address, subject and message.
3. Click Save.
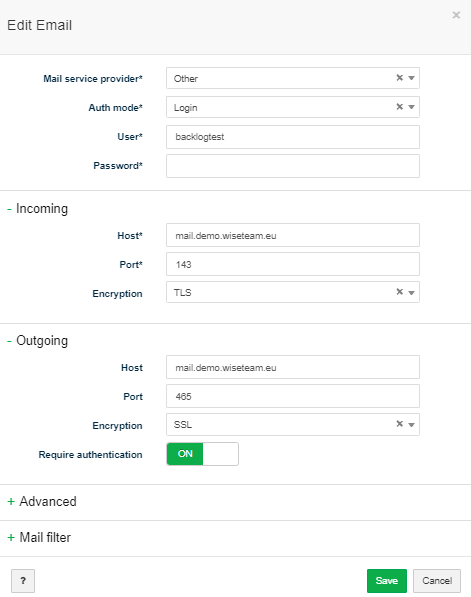
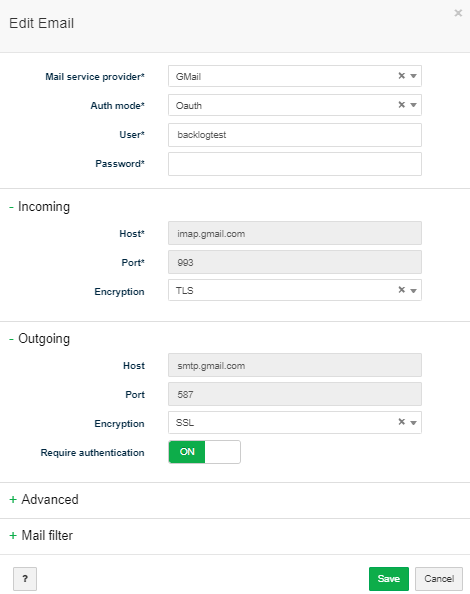
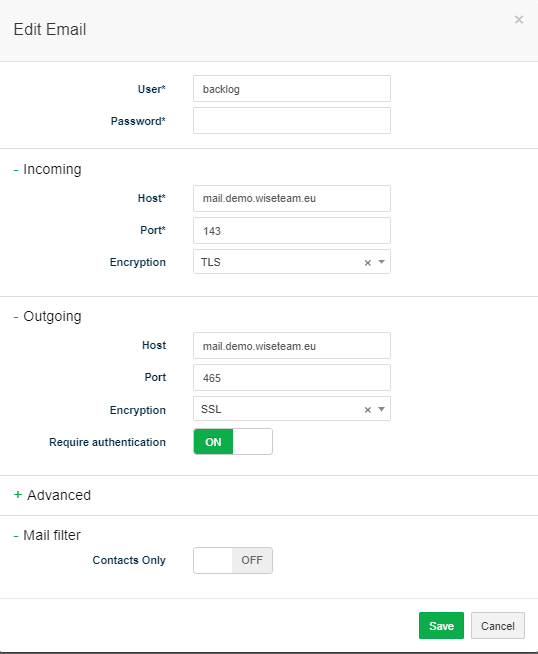
Define email used to receive backlog tasks
To define email used to receive backlog tasks follow these steps:
1. In tab Mail settings click ![]() button. Or click
button. Or click ![]() to add new mailbox.
to add new mailbox.
2. Fill in email information.
3. Click Save.
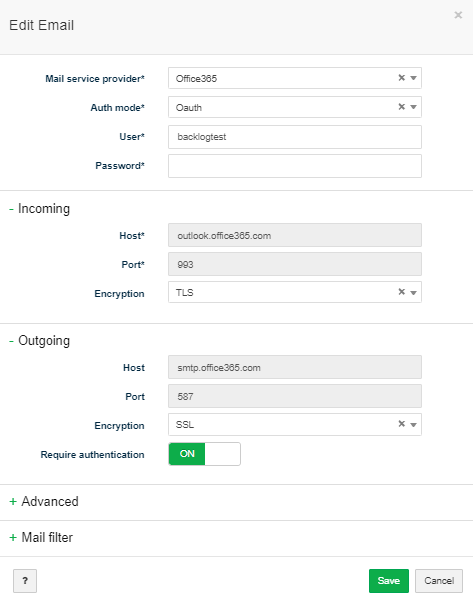
Example:
If mail service provider is O365 set this information:
If mail service provider is GMail set this information:
In order to check whether email was set properly in tab Mail settings click ![]() button.
button.
![]() is used to send test email after configuration.
is used to send test email after configuration.
![]() is used to set related to object of system.
is used to set related to object of system.
![]() is used to clear created mailbox.
is used to clear created mailbox.
![]() is used to 2FA (two factor authentication for O365 and Gmail mail service provider).
is used to 2FA (two factor authentication for O365 and Gmail mail service provider).
Possibility get in the mails from all contact. In the mail settings needs to set parameter Mail filter → Contacts only → OFF.
Note: when configuring an email used to receive backlog emails and in order for the system to create automatic backlog entries from the received email, remember that this email account cannot be used by any users, e. g. if someone uses this account and reads received emails, the functionality will not work.
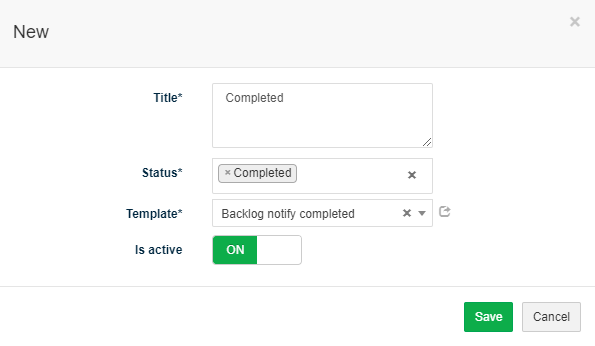
Backlog email triggers: Click ![]() to create backlog email triggers.
to create backlog email triggers.

Fill information:
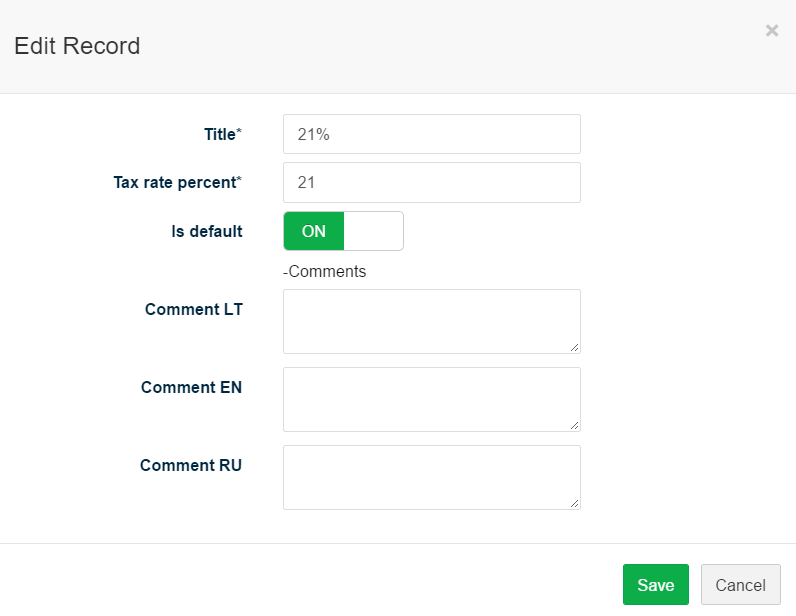
Define Tax Values
To define Tax Values follow these steps:
1. In tab Tax Values click ![]() button.
button.
2. Fill in tax information:
- Title: Tax title will be used and visible in tax fields.
- Tax rate percent: Tax rate percent will be used for tax calculations.
- Is default: Turn button on for default tax value.
- Comment: additional comment about tax rate (may be different for different languages). Invoice line’s title is created automatically according to this description and Invoice’s language.
3. Click Save.
Define Primary Accounts
To define Primary Accounts that contacts (users) will be using WiseTeam follow these steps:
1. In tab Primary Accounts click ![]() button.
button.
2. Fill in information:
- Account: select primary Account from the list.
- Is primary: turn button ON if Account is primary.
- Is active: turn button ON if Account is active.
3. Click Save.

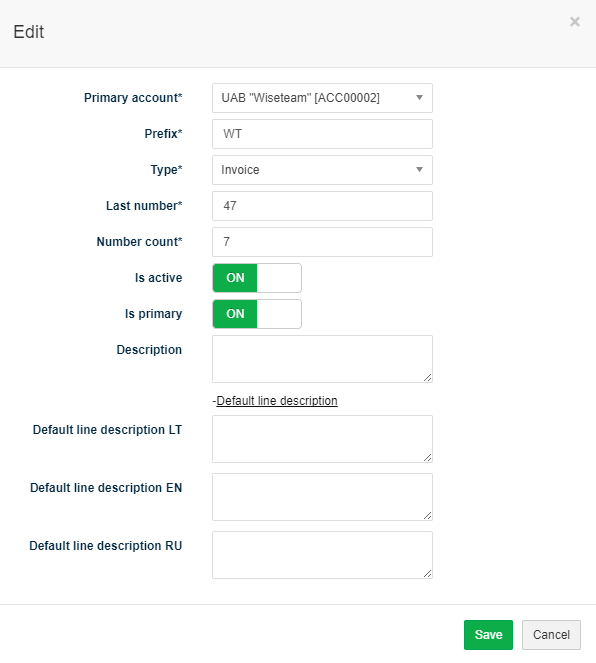
Define Invoice Series
To define Invoices’ numbering rules follow these steps:
1. In tab Invoice Series click ![]() button.
button.
2. Fill in information:
- Primarys account: select primary Account from the list for which numbering rule will be applied.
- Prefix: prefix of invoice number.
- Type: object for which numbering rule will be applied (Credit Note, Invoice, Pro Forma Invoice).
- Last number: last number of the numbering. This field is filled automatically when new Credit notes, Invoices and Pro Forma Invoices are created but can be manually changed if is a need.
- Number count: number count of Credit Note, Invoice or Pro Forma Invoice number.
- Is active: turn button ON to activate numbering rule.
- Is primary: turn button ON if numbering rule is primary.
- Description: add additional description.
- Default line description: Invoice line’s description is created automatically according to this description and Invoice’s language.
3. Click Save.
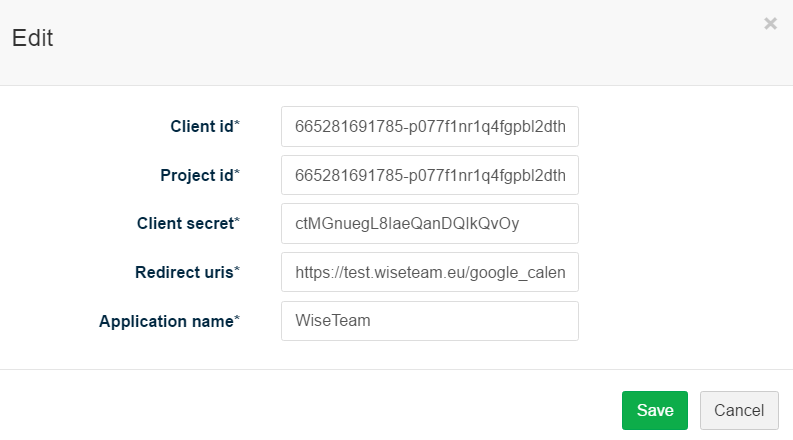
Relate WiseTeam with Google Account
To relate WiseTeam environment with particular Google Account follow these steps:
1. In tab Google click ![]() button.
button.
2. Fill in Google account information.
3. Click Save.